


Almurray42
Established Member
-
Joined
-
Last visited
-
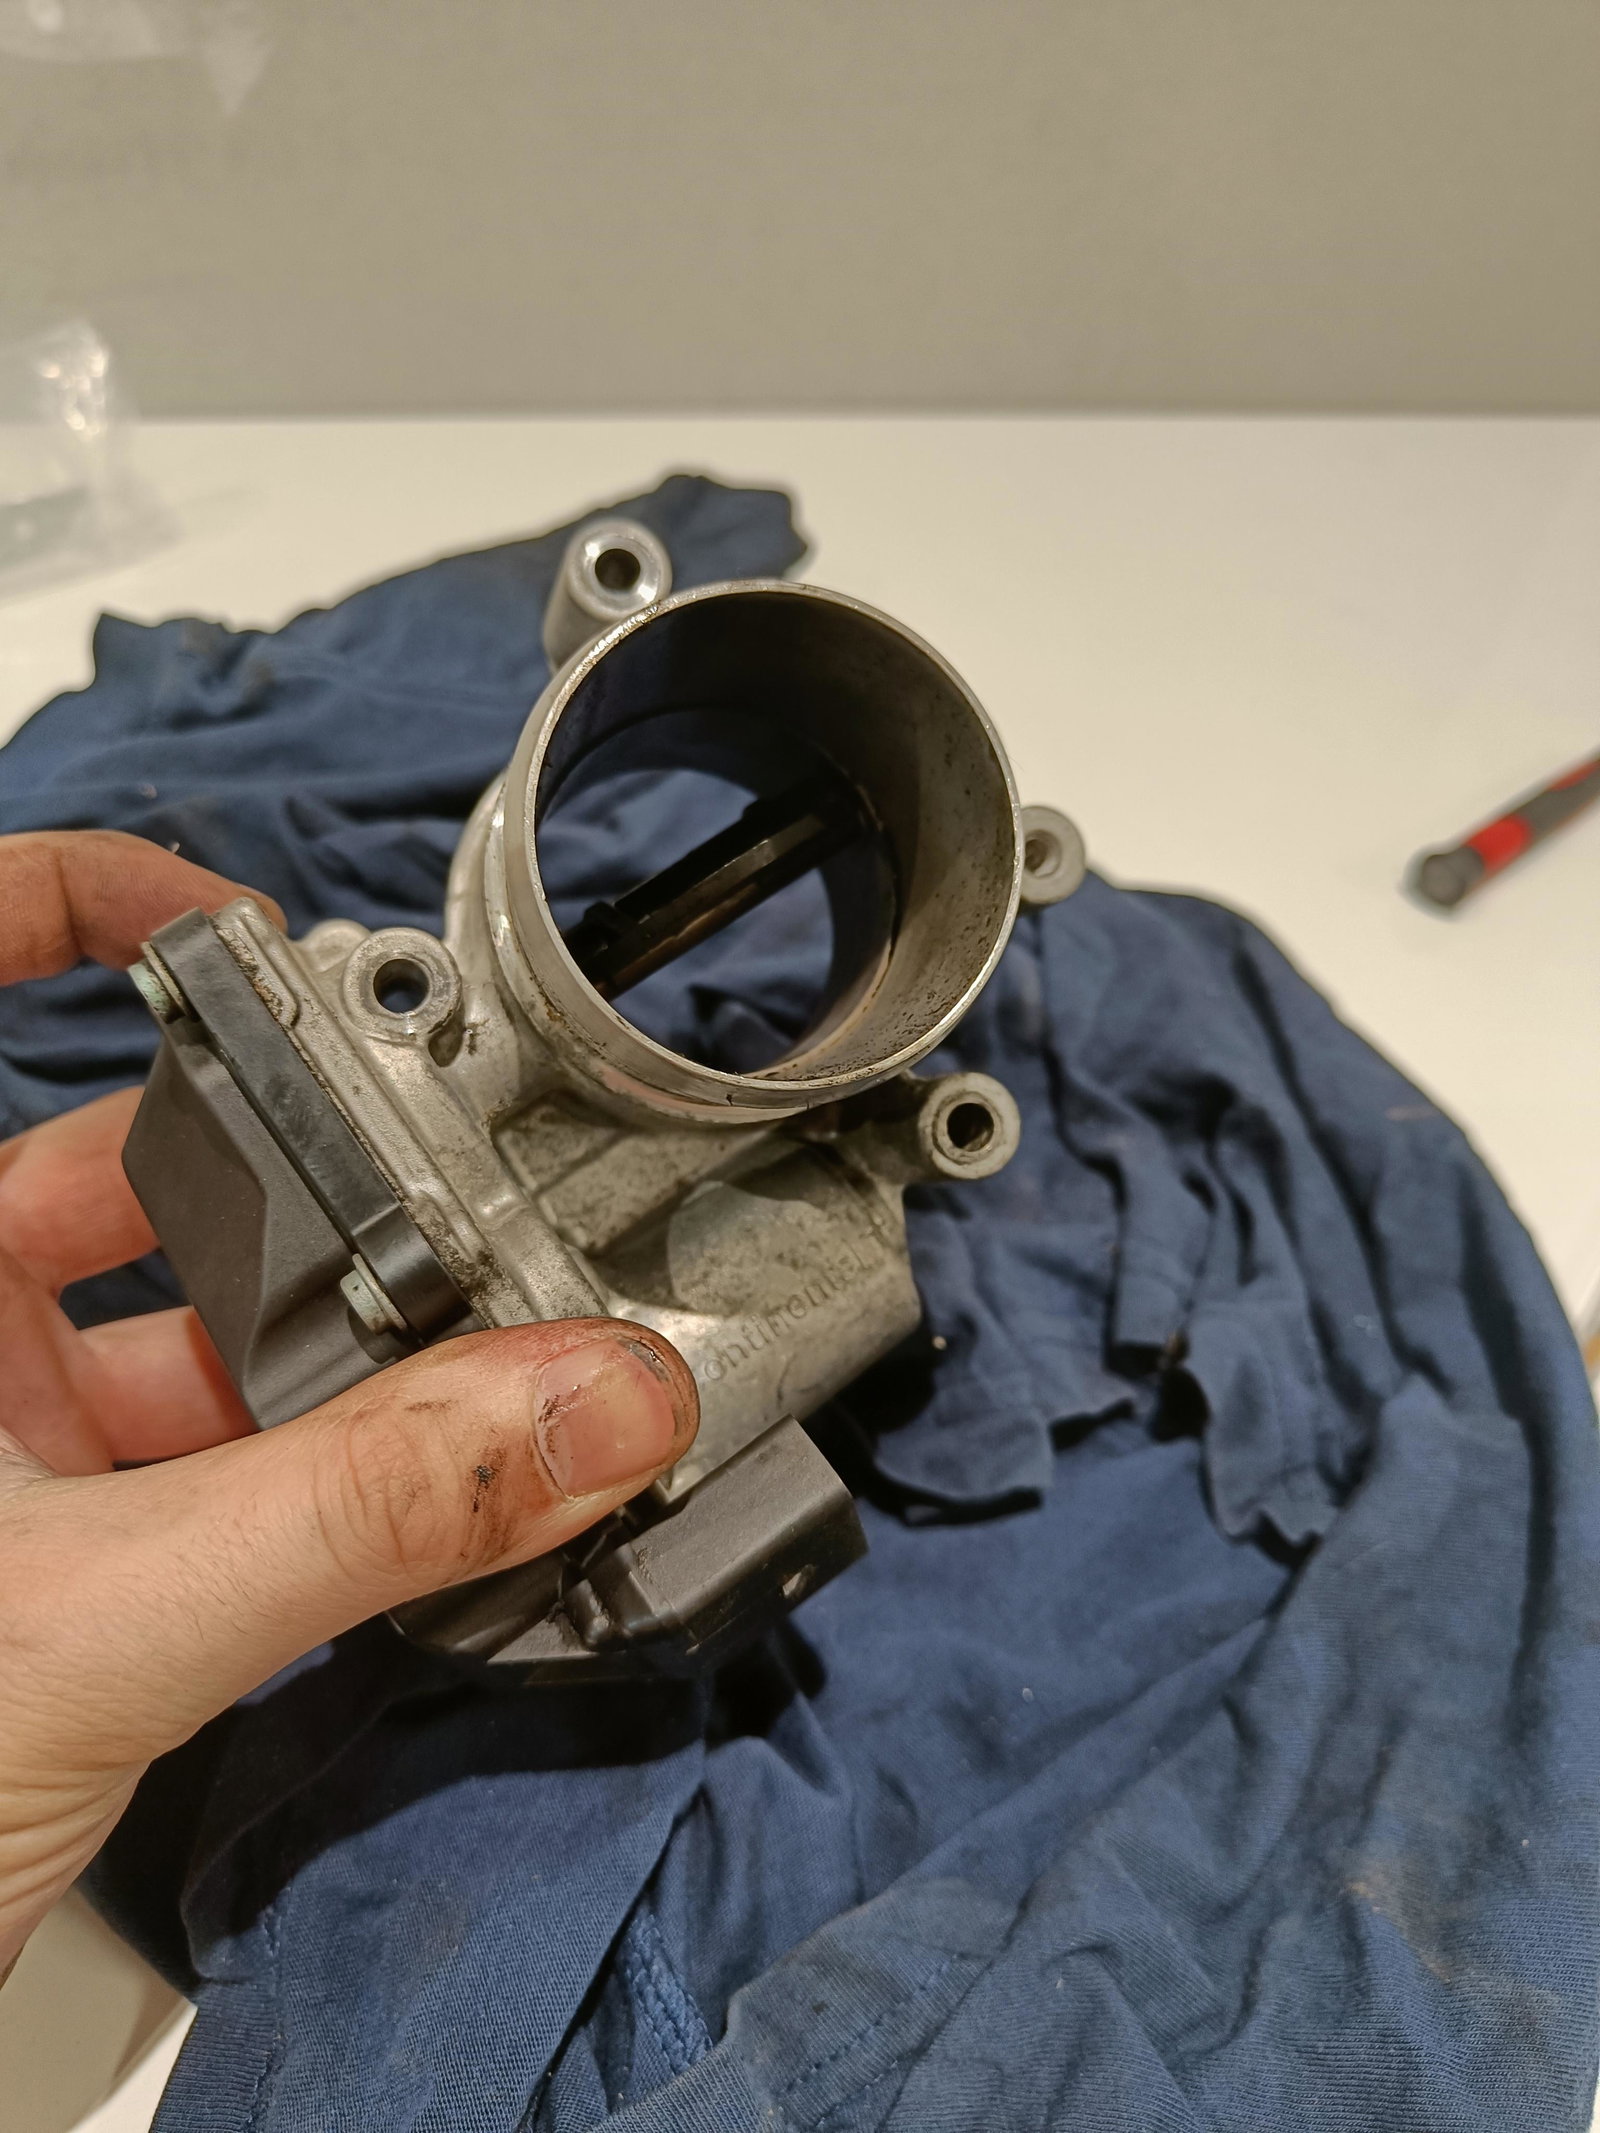
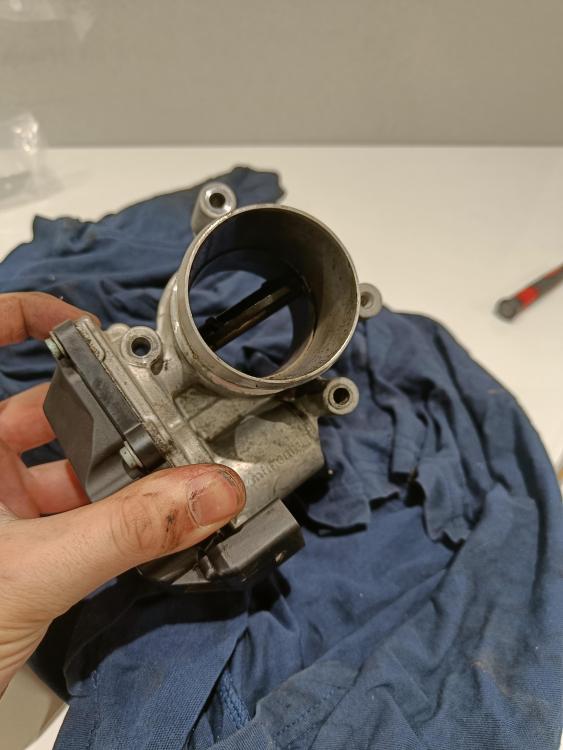
Yes, agreed. I don't have the capacity to test this without doing a lot of research first on limits and Continuous discharge thresholds etc. Having a quick look at the info on Halfords, they do it at their autocentre and hook it up to a machine which apparently tests various things including "Cranking capability" which is essentially a load stress test... As it's free I'll give it a go. Going back to the Throttle body though, I did manage to get it to stick a couple of times when manually actuating it, so I've got a second hand eBay one on the way to pop on and try out. (Was only £35 so worth eliminating I think!) Al
-
Sooo Throttle body is still fairly clean from when I de-coked it all.. (See below) Popped the cover off and looks in pretty good nick inside! Tested the full actuation with my Power supply.. Everything appears to be working normally? VID20230813111403.mp4 Seems unlikely, but wonder if it's a wiring/loom issue? OR actually what Cliff mentioned about a potential battery fault causing the ECU to somehow operate irregularly... The Saga continues... Al

-
Not a Bad shout Cliff, thanks. I will get the battery tested by Halfrauds think they do a "Free battery health check" Voltage is fine on it though. In other news, the Mrs was drivingl today and EML came on! Got a Code P2103 "Throttle actuator control motor(TAC) - Circuit High" First time I've ever been glad to see the Engine Light! Gives me something to start looking at 🙂 Will do some research on this and update.. any known common faults with these I should know about? Thanks again Al
-
I'm certain it's not the mounts. The Smoke and rough running is 100% linked. Engine off/on stops Both (Have even done so whilst driving, clutch in, engine off/on and clutch out temporarily stops it) Might need to do more digging! Maybe see if I can get some monitors logging whilst driving and capture some differences in the monitors...
-
I'm Returning to this thread as I have since resolved the more pressing issues being the Oil leak (Which if you've seen the thread turned out to be an almost full engine rebuild job!) I since had another problem with delayed boost and Limp mode on motorway... Turns out it was the turbo actuator (Suspect Torn Diaphragm) which I've replaced and that problem is resolved. So this is now one of the final issues I have. So...The Intermittent issue of what I described previously as a "Rough idle"... To clarify, what it ACTUALLY is: Seems to be excessive shaking of the engine. To summarise: SYMPTOMS: Whilst Driving, or on engine start, car enters an unstable state INTERMITTENTLY. On Idle, Engine is shaking - to the point where you can feel it when sat in the car. In this state, at Idle the Revs seem to be stable and aren't fluctuating. When Accelerating in this state it can have hesitation and almost be a bit "Jolty" on acceleration. When accelerating, lots of light coloured smoke is emitted. Turning engine off/on fixes this fault state 99% of the time. No warning lights or ECU Fault codes present. Known "Good" parts: From research, some suggestions are saying to check various things. I have done a lot of work on the car recently so have listed below some parts which I know or am confident are not causing the fault. As I check things, i'll edit the Known Good list. Pistons/Rings/Blow-by Turbo/Actuator Timing Head Gasket This leaves me with the following train of thought: As I've recently done a lot of work in the engine, I'm confident that the issue will lie with some sort of ancillary.. Could it be: Something in the Vacuum system? EGR related? Swirl flap related? CCV? Fuel pressure regulator? Injectors? Fuel filter? Not really sure where to go next. What's getting me is the fact that this can be fixed by an Engine on/off.
-
Thanks All, it was quite an undertaking considering I'm An electronics engineer - the polar opposite of a mechanic! Ultimately, it started as an oil leak fix and gradually spiralled to almost a full rebuild! All in though, I've learned a lot and very pleased with the results, thanks again for the advice here and there people! Al
-
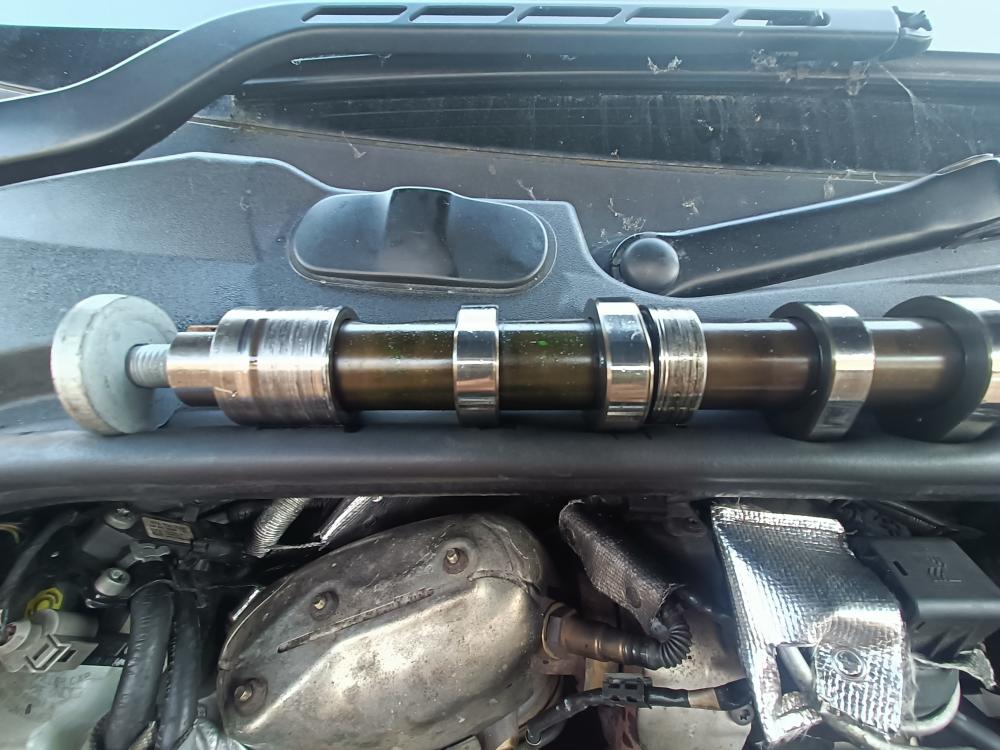
Final Update! So, I've completed all the work (Finally!) and the car is back together and running! No Oil leak! 😄 In the end, I did: Replacement Cylinder Head (Stripped, cleaned, cleaned and soaked Rocker arms & lifters) Head Gasket (+Plenty of other gaskets & Seals!) Camshaft Oil seal Piston Rings (& Cylinder Hone) Big end bearings (& Big end cap bolts) Intake manifold & EGR teardown & Clean Balance Shaft Mod for 100mm Keyway Oil pump check/clean/soak Timing belt (Including water pump, Tensioner, all pulleys, idlers, studs & bolts) Aux Belt ------ Note: When refitting the balance shaft assembly, you're supposed to use a locking tool that's around £40, which I couldn't justify for minutes use, so I took some measurements and made a locking tool from Acrylic on my Laser cutter, Happy to share pics of this if anyone's interested.. Could even sell them for a small amount if anyone needs one! ----- Thanks for following along, MOT up next! 😮 Al
-
Update for anyone else looking at the Balance shaft mod to 100mm with improved shaft... Kit arrived from ZED performance, and Using a combination of Common sense and similar torque ratings with same size/grade bolts on the car, I'll be using the below Torque settings for The two halves of the balance shaft: 1 - Hand Tighten 2- Diagonally Outwards from Centre: 8nm 3 - Same pattern, 20nm 4 - Additional 90 Degrees. Note: If anyone plans to re-use the old bolts, I'd recommend NOT doing step 4 and instead adding a decent high-temp threadlock to the threads. Building my knowledge as I go, but want to share as I do so... There doesn't seem to be a wealth of info out there relating to this mod even though the issue seems quite common! Al
-
I've taken a step back and agree with your Logic. Ordered a Full kit now with Tensioners, Idler rollers, Timing belt and water pump (INA so should be good quality!)
-
Update: Parts on way from Germany. I am Doing the 100mm Balance Shaft Mod to avoid this from happening again as this was all the result of the SH1t3 Engineering on the Oil pump hex drive keyway in the Balance Shaft. For anyone else reading, after a LOT of research it seems that unless you want to spend £150+ on a replacement/exchange balance shaft part, the only available option is the Kit from ZED engineering here - https://shop.zedperformance.co.uk/passat-a4-2.0-tdi-balance-shaft ?search=balance shaft This kit comes with a SS threaded "Bolt" insert with a 6mm Hex shaft and a longer, 100mm Hex key. This is what I'll be doing. I've got a chap I know that works in a machine shop and he will drill & Tap the shaft and put in the insert for me. The problem that this creates is that there's nothing in the Audi Workshop manuals or it seems anywhere about disassembling and reassembling the balance shaft... I loosened off the bolts in a diagonal out-in sequence. For the 2 halves of the balance shaft assembly there are: QTY 9: M8 x 50mm (1.25mm Thread Pitch) Grade 8.8 Bolts (Unserrated Flange Bolts) QTY 3: M8 x 30mm (1.25mnm Thread Pitch) Grade 8.8 Bolts (Unserrated Flange Bolts) Unfortunately as Audi only sell the complete balance shaft unit, they don't list part numbers for replacement bolts or torque settings. I'm assuming that being Grade 8.8 they are also stretch bolts and as such need replacing. The closest VAG part numbers i've found for replacements of these bolts are: QTY 9: N91063901 QTY 3: N10665001 I have ordered some of these for reassembly. Need to figure out appropriate torque settings... I'm assuming it'll be similar to the torque settings needed for attaching the Balance shaft assembly to the block. Happy to share photos and final results when reassembling if it'd help anyone... The saga continues... Al
-
Thanks Steve Replacement head arrived today, from an engine on 85k and it's in remarkably good nick! Are the valve seats and relapping strictly necessary would you say? I don't really want to have to disassemble the head and take it to a shop to get the seats cut... Wouldn't that also mean new valves for fresh seats? Then if I'm doing valves may as well do valve stem seals, lifters and rocker arms... Its a bit of a rabbit hole 😂 Al
-
Hi Cliff I was thinking about this - water pump was last done at 70k and it's at 115k now... Reckon it needs doing?
-
Update: Big End Bearing Caps Off, Bearings look very good, but will replace while i'm at it. Cylinder head off - Cylinder Bores look good. Plan of action: New (Used) Cylinder head Head Gasket Exhaust & Inlet manifold Gaskets Clean EGR valve Cam belt & Tensioner New Big End bearings + Stretch Bolts Piston Rings & Hone Cylinders Anything else I should do while stripped down this far?
-
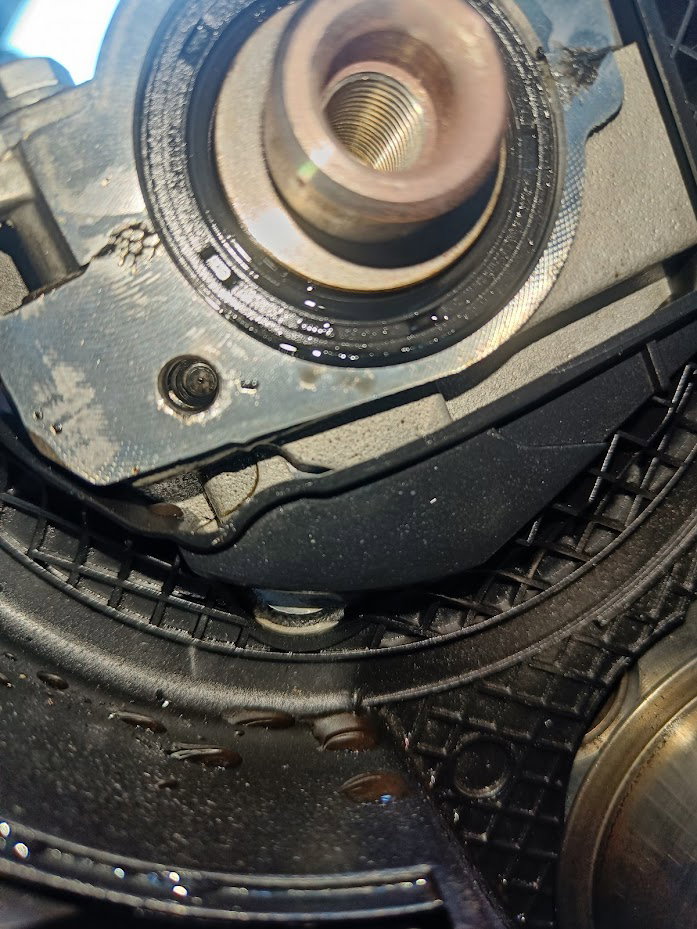
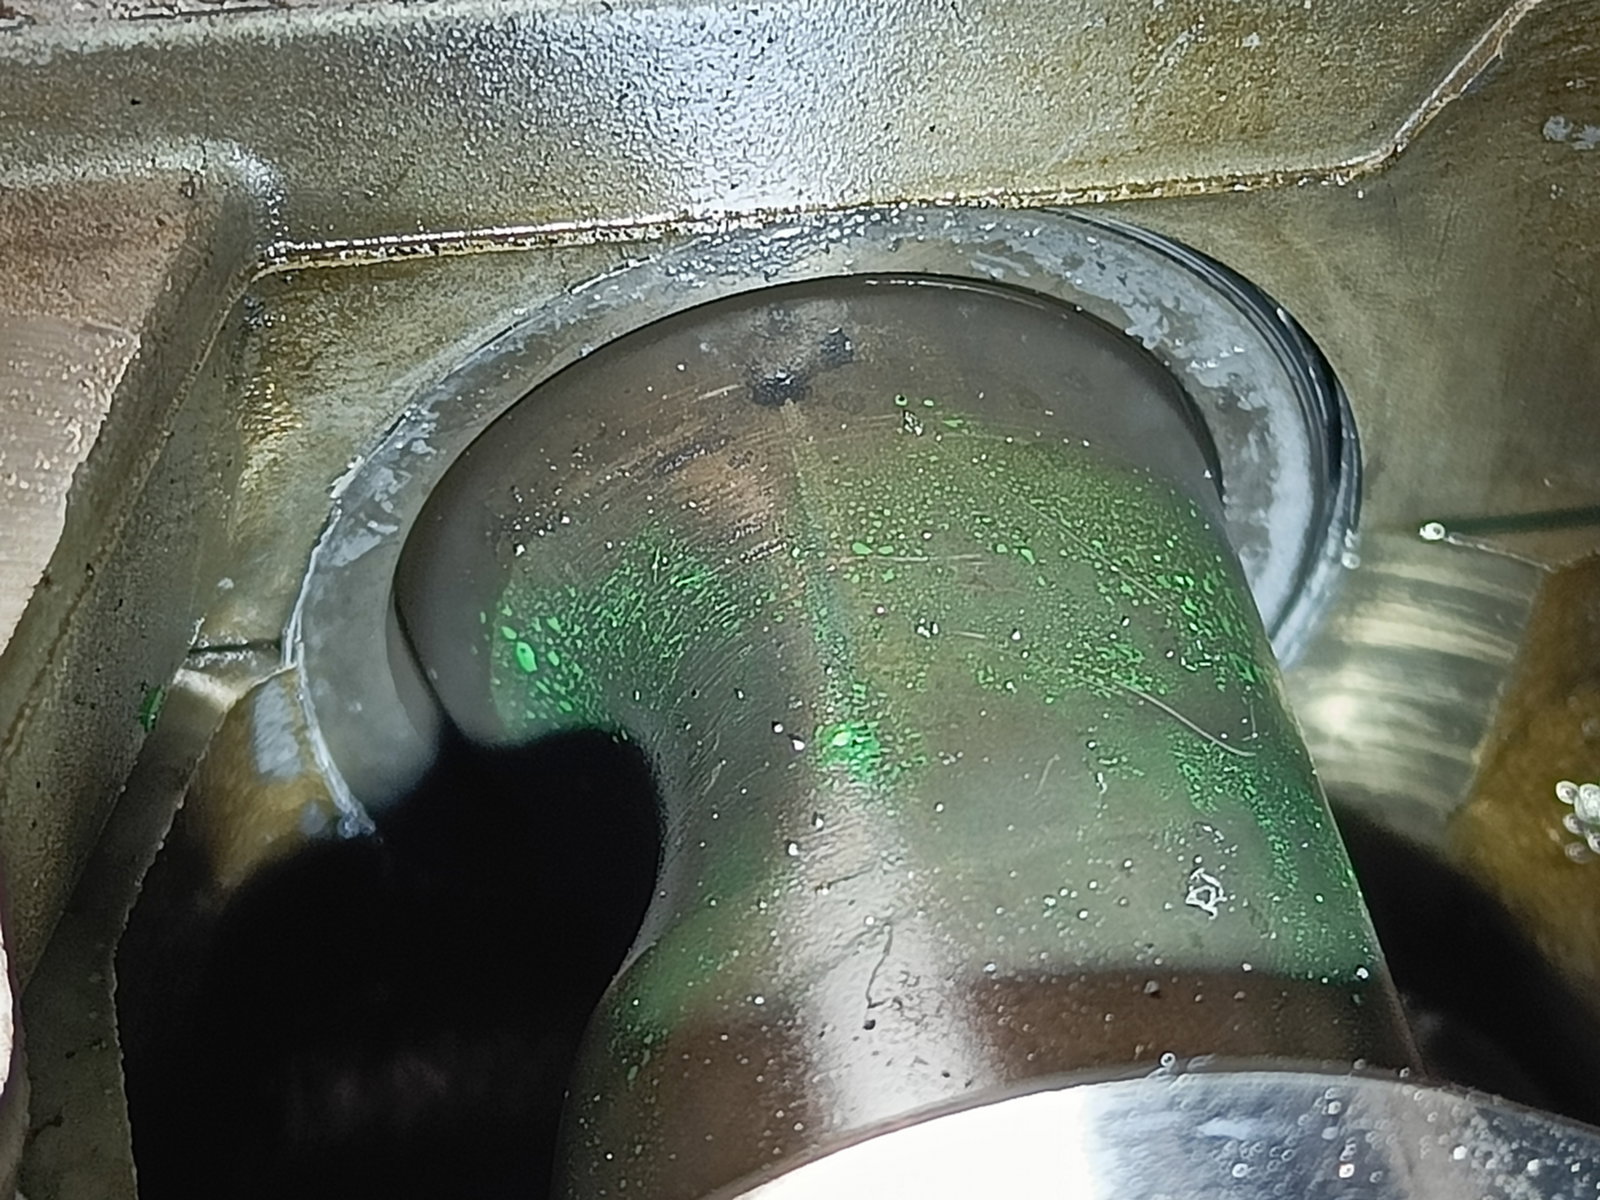
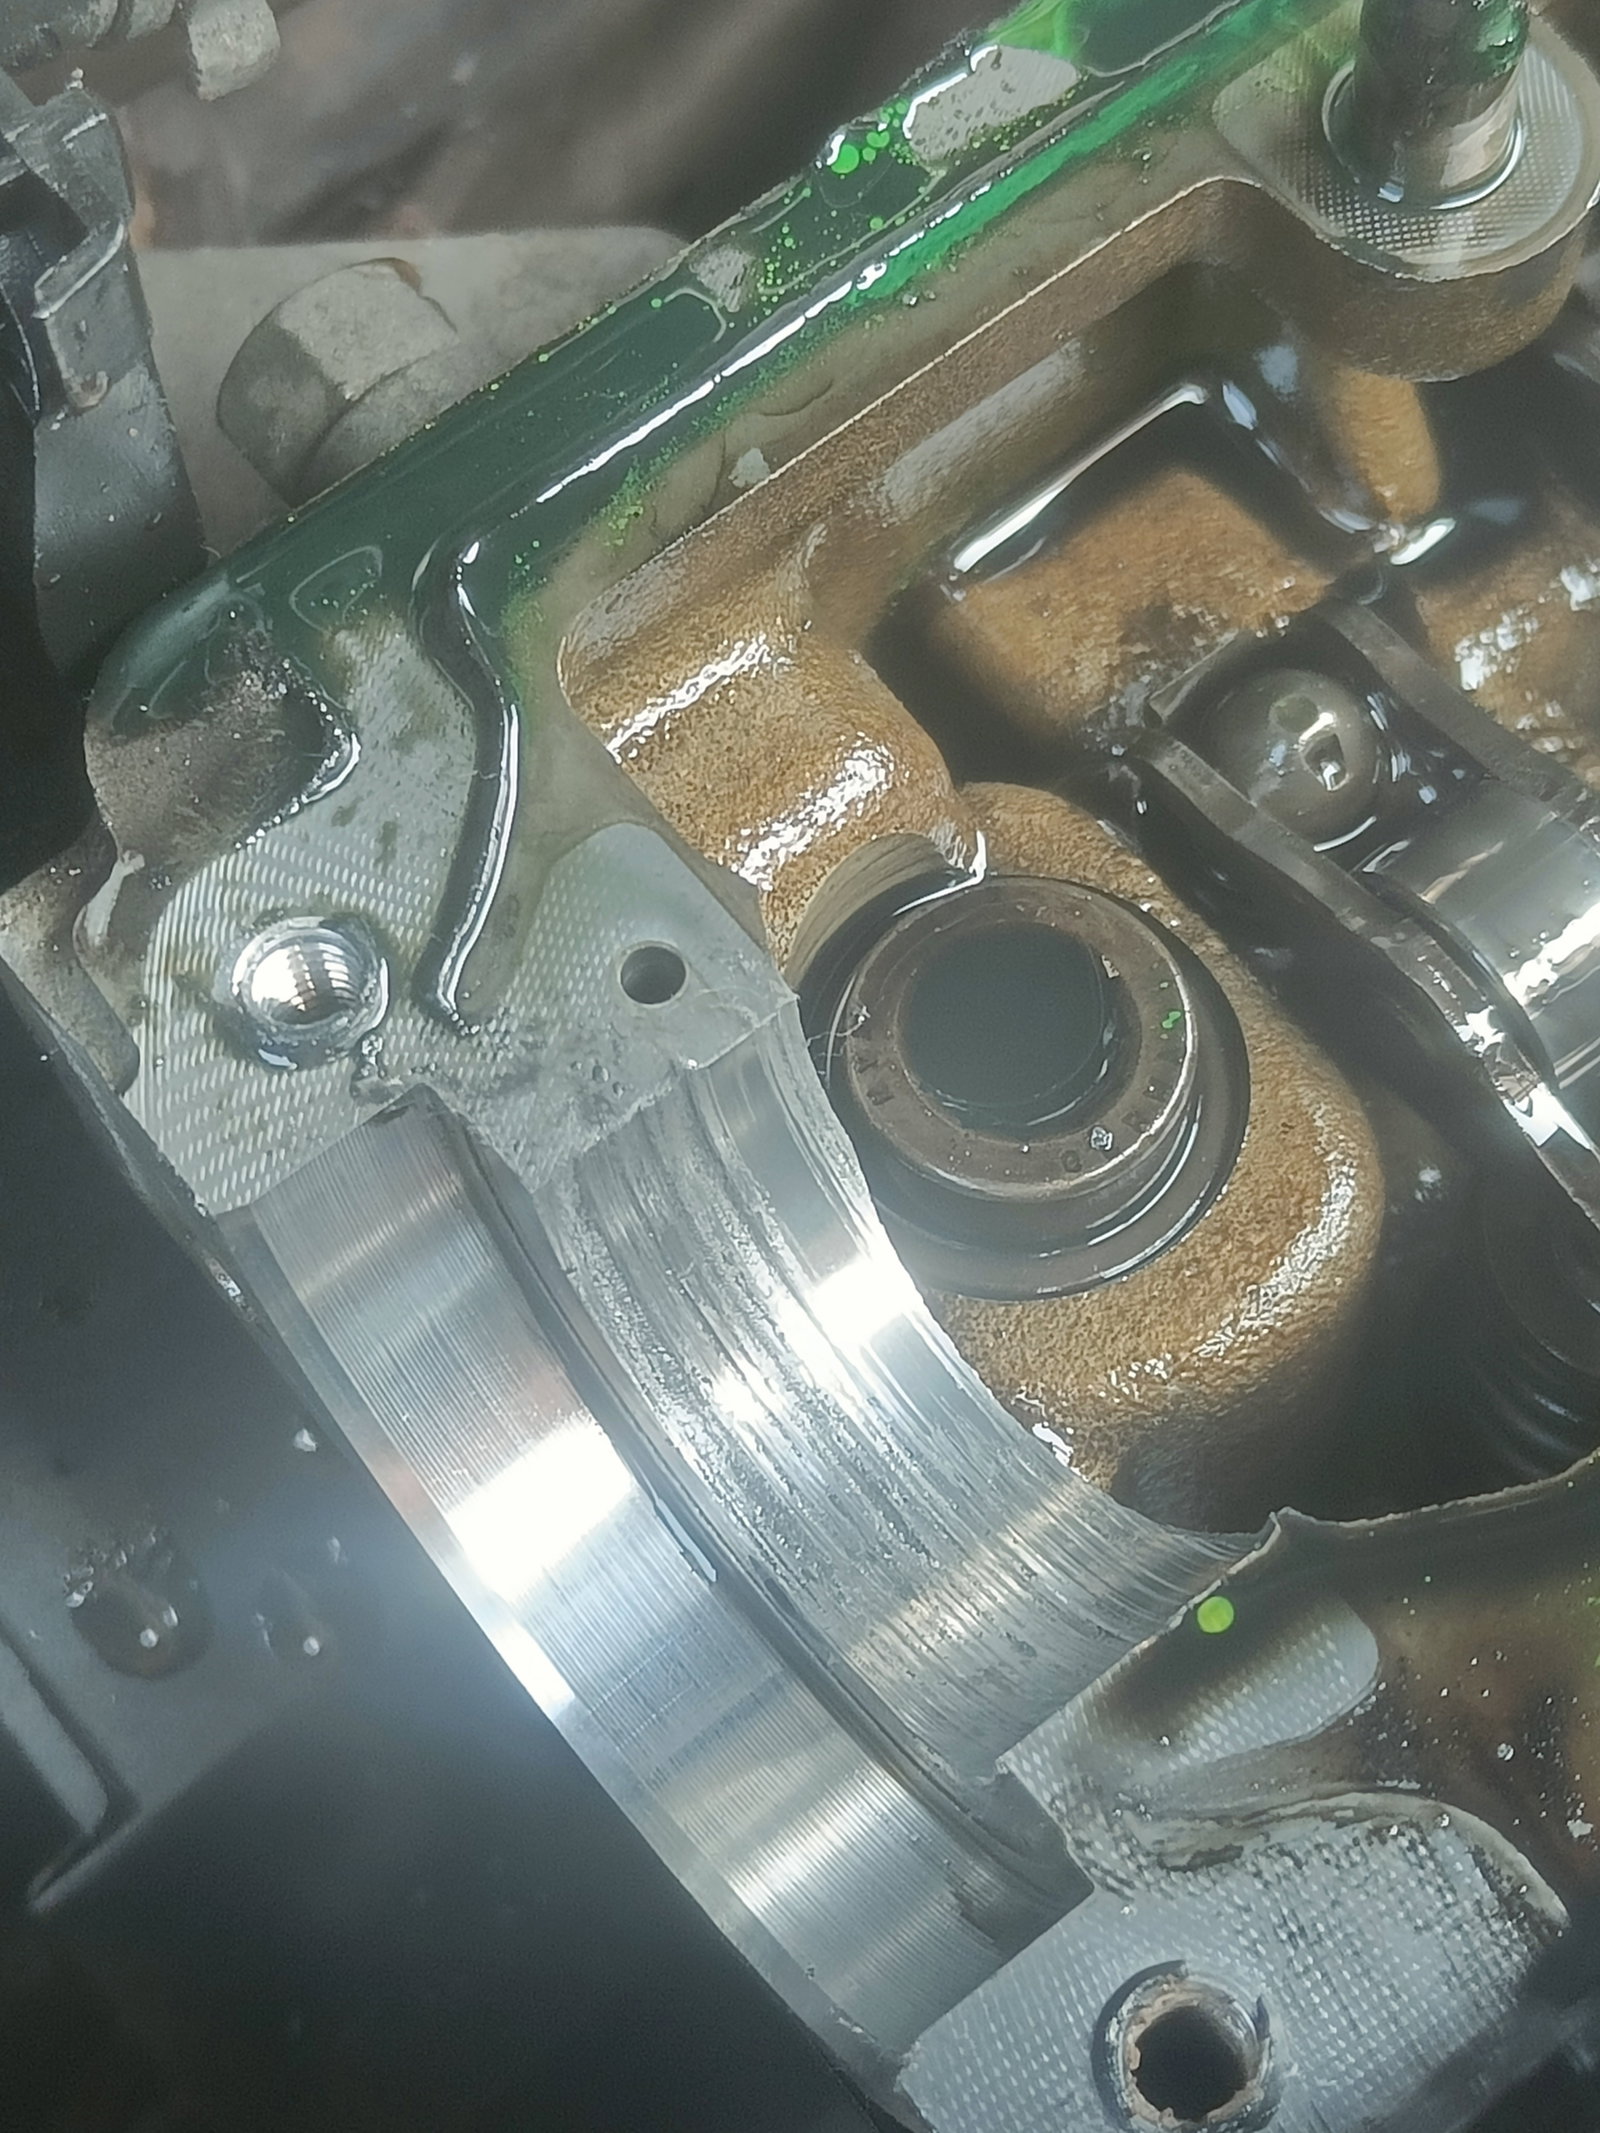
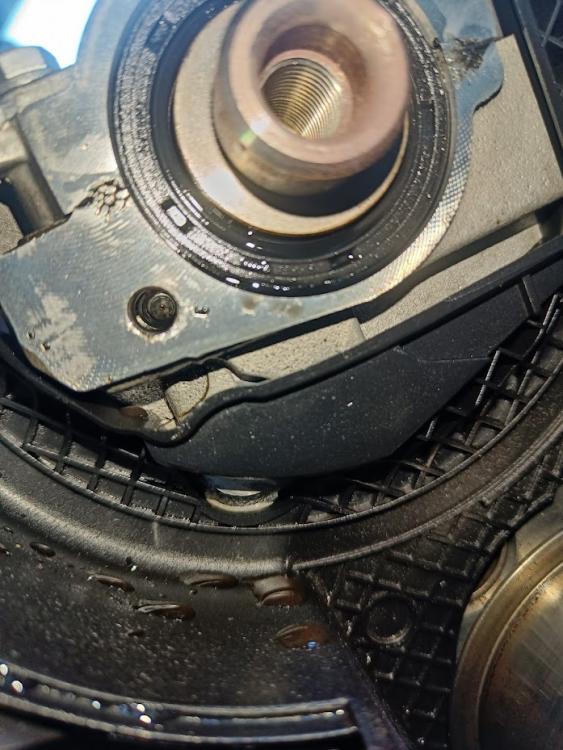
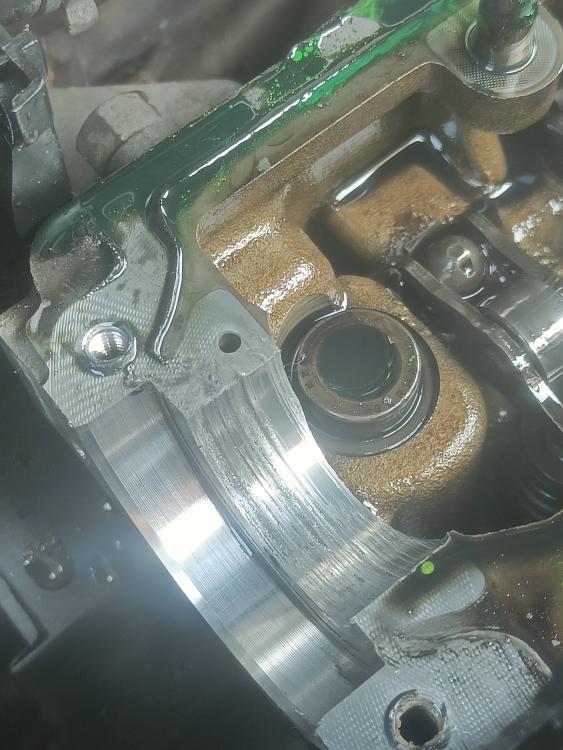
Well.. I appear to have found the cause of the leak. Camshaft oil seal... Until I looked deeper.. Took off the Cambelt and Camshaft sprocket -To see a nice oily drip from the Camshaft seal. Image below: I looked on the inside after spotting this, and noticed that the where the exhaust cam exits the Head, there looked to be excessive rubbing/wear on one side and a gap on the other (the green is UV dye from when I was tracing).. Image below: So I decided to take the Camshaft retaining frame off to have a better look and ohhhh dear... See images: Interestingly, There aren't Bushes/Bearing shells to replace as i'd have thought there would be... The Cams just run directly in the seats of the Head & Cam carrier... Is this even fixable? 😞 Al

-
Thanks Steve I don't think it's coming from the Crankshaft seal as this is much lower than where i'm seeing the oil dripping from - I've decided that my best course of action is to do the Camshaft oil Seal. I've started taking things off in preparation, just waiting for my Locking kit to arrive. Cambelt Was last changed at 85K and now at 115K, so only 30K on it but think while I have it off, it's worth doing. I'll update here Hopefully tomorrow provided Amazon deliver my locking kit before dark! Having the Rear timing belt cover off will definitely give me visibility as to where it's actually coming from. Al