


niedzial1983
-
Posts
1,264 -
Joined
-
Last visited
-
Days Won
37
Content Type
Profiles
Gallery
Forums
Events
Articles
Videos
News & Articles
Premium Membership
Store
Posts posted by niedzial1983
-
-
What wheel is that ? 18"?
-
That looks low...
-
Post a pic from the side so we can see how it looks like .
On sline you will have sport suspention -30 . I belive the shocks are shorter than the standard
-
Hey. So how many we have for this ? With a bit of luck ill be there as well . What zone is our stand ?
-
Get a mobile sprayer booked , it should not be more than £150 to blend in
-
Pre-facelift Cars - 04 - 08 plate
1. Confirmation on Lock
[Select]
[46 - Central Conv]
Coding - 07]
+2048 to your existing coding (example - original code is 0008443 + 2048 = 0010491)
[Do it!]
2. MMI High Hidden Menu
[Select]
[07 - Control Head]
[Adaption - 10]
Drop-down Menu
[Select - Service Menu]
Change 'New Value'to 1
[Test]
[Save]
Drop-down Menu
[Select - MMI System Retstart]
Change 'New Value' to 1
[Test]
[Save]
*MMI will now restart*
[Done, Go Back]
3. Battery Meter
After MMI restart and Hidden Menu enable - press Radio then hold in Setup + Car for a few seconds (it might take a few times to get timing correct)
[Select] DIAG SETTINGS
[Select] Car Menus Maske
[Select] Battery Level
Scroll to Accept Changes
Press RETURN 3 times
Restart MMI using Setup + MMI Control Knob + Upper Left Inner Key - release
4. Visual Parking Aid - if supported
[Select]
[76 - Park Assist]
[Coding - 07]
Change second digit to '2'
Example - Original code is 0001106 ... New code is 0201106
[Do it!]
Restart MMI and select reverse
5. Passenger Mirror Dip on Reverse - if supported
[Select]
[52 - Door Elec Pass.]
[07 - Coding]
Add +128 to original coding
Example - original code is 0002682 ... New code is 0002810
[Do it!]
Select LHS mirror on control and select reverse - mirror will dip if correct hardware is fitted
6. MMI High Startup Screen
[Select]
[07 - Control Head]
[07- Coding]
Look for the 3rd digit and change this to your preference as below
xx0xxxx = A6
xx1xxxx = S6
xx3xxxx = RS6
[Do it!]
Now go into:
[10 - Adaption]
Drop-down Menu
[Select - MMI System Retstart]
Change 'New Value' to 1
[Test]
[Save]
*MMI will now restart*
[Done, Go Back]
7. Disable Seatbelt Warning
[Select]
[17 - Instrument Cluster]
[07 - Coding]
Look for the 6th digit and change this to your preference as below
xxxxx0x = No Seatbelt Warning
xxxxx1x = Seatbelt Warning (EU-NCAP)
xxxxx2x = Seatbelt Warning (NAR Old)
xxxxx3x = Seatbelt Warning (NAR New)
xxxxx4x = Seatbelt Warning (EU-NCAP incl. Passenger)
xxxxx5x = Seatbelt warning (NAR Old incl. Passenger)
xxxxx6x = Seatbelt Warning (NAR New incl. Passenger)
[Do it!]
Turn ignition off and on
NB . 2, 3, 5 & 6 are related to North America.
8. Bluetooth Module Voice Control - If your BT module supports this change
[Select]
[77 - Telephone]
[07 - Coding]
Look for the 6th digit in your current coding and change this to your prefered voice language
00x0x00 = Voice Control Off
00x0x10 = German
00x0x20 = English (UK)
00x0x30 = French
00x0x40 = Italian
00x0x50 = Spanish
00x0x60 = Spanish (USA)
00x0x70 = English (USA)
00x0x80 = French (Canada)
00x0x90 = Speaker dependant voice selection
[Do it!]
Now restart your MMI
[Select]
[07 - Control Head]
[10 - Adaption]
Drop-down Menu
[Select - MMI System Retstart]
Change 'New Value' to 1
[Test]
[Save]
*MMI will now restart*
[Done, Go Back]
9 - Scandanavian DRL (rear tail lights on with front DRL)
[Select]
[09 - Cent Conv]
[Coding - 07]
Change the last digit in the coding string to '2'
Example - 0xxxxx2
[Do It!]
10. Changing radio source by pressing RADIO
[Select]
[07 - Control Head]
[Adaption - 10]
Additional MMI Options
Add 4 to your existing code (Frequency/Source Change via Function Button Active)
[Test]
[Save]----------------------------------------------------------------
Facelift Cars - '58 plate onwards
1. Enabling Gauge Test/Needle Sweep
[Select]
[17 - Instruments]
[Coding - 07]
[Long Coding Helper]
Click on the second byte in the list.
Check the box for "Gauge Test/Needle Sweep active"
[Do It!]
2. Hidden menu in 3G MMI
[Select]
[5F - Information Electr.]
[Adaptation - 10]
Choose Channel 6
change value from 0 to 1
[Save]
[Done]
3. Enabling VIM (Video in Motion)
[Select]
[Control Module 5f]
[Advanced ID - 1A]
Make a note of the serial number and decode using MMI VIMGen
[Security Access - 16]
Enter the code generated above
[Do it!]
[Adaptation - 10]
Choose Channel 48
change value from 0 to 255
[Save]
[Done]
Restart MMI
4. Enable Battery Meter once #2 has been completed
Hold in CAR + SETUP
car
carextdevicelist
check "Battery"
return
carmenuoperation
set "Battery" to 5
return
Restart MMI
5. Enable Bluetooth on MMI 3G
[Select]
[Control Module 5f]
[Adaption - 10]
Channel 06
New Value = 1
Test, Save, Done.
Now go into the Hidden Menu, see 2. Hidden menu in 3G MMI
Diagnose>Settings>Tel Settings Misc
Change the available options to - [no WLAN/no NAD/BT/HFP] 4/16
Restart MMI (Hold in SETUP + Centre MMI Knob + Upper Right Inner Key]
[Select]
[Control Module 5F]
[Adaption - 10]
Channel 17
New Value = 1
Test, Save, Done.
Restart MMI (Hold in SETUP + Centre MMI Knob + Upper Right Inner Key]
If you have Nav fitted, the microphone will be present, if no Nav is fitted then you need to purchase microphone pack 4L1 (or 4L2) 035 711 G
6. Enable AMI (Audi Music Interface) on MMI 3G (after fitting the hardware)
[Select]
[Control Module 5F]
[Adaption - 10]
Channel 6
New Value = 1
Restart MMI (Hold in SETUP + Centre MMI Knob + Upper Right Inner Key]
Go into hidden menu, hold in CAR + SETUP ... WARNING DO NOT CHANGE ANY VALUES YOU DON'T KNOW OR ELSE BAD BAD THINGS MAY HAPPEN 😉
Diagnosis -> Settings -> Audi Music Interface (AMI) set to 7/8
Press RETURN and come out of the hidden menu.
Restart MMI (Hold in SETUP + Centre MMI Knob + Upper Right Inner Key]
Press MEDIA, Source and test the AMI.
7. Visual Parking Aid - if supported
[Select]
[76 - Park Assist]
[Coding - 07]
Change second digit to '2'
Example - Original code is 0001106 ... New code is 0201106
[Do it!]
Restart MMI and select reverse
8. Enabling Lap Timer/Boost Guage/Oil Temp
[Select]
[17 - Instruments]
[Coding - 07]
[Long Coding Helper]
Check the box for "Lap Timer active"
[Do It!]
9. Enable Rear DRL (Scandinavian Lights)
[Select]
[09 - Cent Elec]
[Coding - 07]
Change the 7th digit (ie the last one) to 2
[Do It!]
10. Enable Passenger Mirror Dipping
[Select]
[52 - Passenger Door]
[Coding - 07]
Byte 4, bit 3 - Position memory for reverse gear dipping active
Tick the box
[Do It!]
Test by turning ignition off and then on, select the passenger side on the adjustment switch and select reverse.-
 2
2
-
-
Plastic ring can be a pain to remove without an "audi special key ". I used a bot of wood and a hammer on mine 🙂
-
Same as last time. Take it out and have a look
-
More picures and details would be helpfull
-
Did you plug in vcds to check for faults ?
-
Go to bristol transmitions for diagnostics
-
So is there 1 missing from the bonnet ?
-
Bonnet stop bump buffer ...?
-
Vag com (vcds)
Obdeleven ( android only )
Carista
-
3 hours ago, Paul A6 said:
started to happen again as you say, i cleaned connector with contact cleaner but still no gauge whats stage 2 please
was this the connector i was meant to mine is on drivers side passenger side is just a round white plate
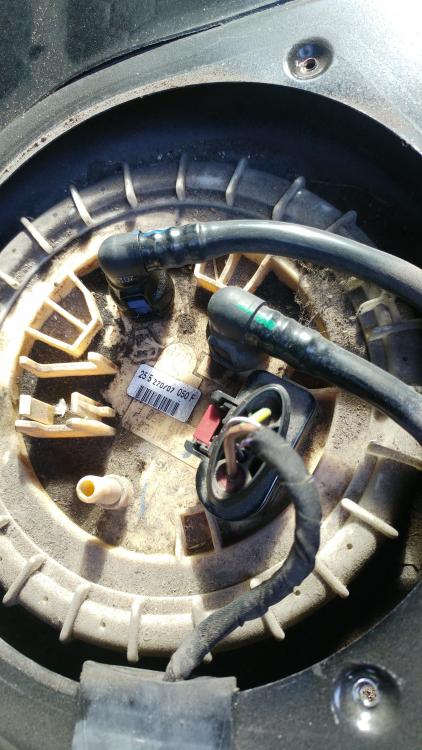
You need to undo the plastic ring and take out the sender . There is a connector there that need cleaning or cutting out and solder the cables
-
8K0880201AE - round shape ( i belive 1 stage)
8K0880201AN - trapezoid shape ( 2 stage)
-
You need to plug in vcds and check what faults it has .
My bet is Component Protection
-
Hi 🙂
1. Lemans or special edition ( audi got told off by lemans for using the name) is a trim level , its not a top spec.
2. There are mauals as well as far as i know.
3. Depending on what hardware is installed on the car ( google vcds mods a6 c6)
-
Its a common fault .
For the record you have C6 not c5 🙂
C5 was up to 2004. And c7 is from 2011.
1. the amplituner is eaay to get on eBay. Have a look on the old one for a part number and search on eBay. The only problem would be CP . Audi have component protection on some modules to prevent theft . This needs to be removed othervise it wont work ( well it will on 1 speaker ) . This can be removed by audi or someone who has the equipment ( google for CP removal ) . Once cp is removed its just a simple swap with the old one.
2.re pipe anything will do as long as it dosent leak again !
-
I think new cars with MIB and MIB2 systems dont have ami as such ( seperate unit) and its built in. Standard location would be under the armrest
-
norm in + - 2.99 , but the 0.99 seem abit high comparing to the rest
the worn seals wont show on vcsd
-
On 5/28/2017 at 8:38 AM, Hoggy1972 said:
I just did my fronts this week. If you look on the chassis label either in the boot by the spare wheel, or in the handbook you'll see a 3 digit code, 1ZL or 1LG. If it says 1ZL then they are 347mm, if 1LG then 321mm. Hope that helps.
Exactly that ! 🙂
there was aslo 360mm for s6 and rs6
-
You need a tool to hammer out injectors...
-
Common fault are injector washers. They tick when worn . Fairly cheap to fix.


Buying 2.8 fsi or 3.2 fsi Quattro which 1.
in Audi A6 (C6) Forum
Posted
3.2 is very nice. I have 3.0tdi and i love it but if i would be buying the car again i would go for 3.2 petrol or more.... 🙂