


gsmdo
Established Member
-
Joined
-
Last visited
Everything posted by gsmdo
-
They are in very specific points - what is underneath the bumps the rust has formed on? 🤔
-
I can't believe how much fuss there is over this sort of thing. We stopped using 'Manpower' decades ago, in favour of 'staffing' or 'personnel' - this is just a logical extension of this. With everything going on that we should be getting fed up with, I'm not surprised the judge threw it out - he/she (see what I did there?) probably considered it a frivolous lawsuit... Mike 😎 (He, him)
-
Better pic of the seats. Mike 😎

-
-
I actually had a filter removal tool that fitted - it’s the same size as my motorcycle one. It had just been severely overtightened 🤨 Good tip on running the lift pump rather than cranking the engine 👍 I think I’d prefer that to trying to fill the filter. 🤔 Can’t tell you how satisfying it is to have gone through the diagnostic process and finally resolved the problem. I now need to clean it - it’s filthy… Mike 😎
-
Damn - I’ll never be able to unsee that now… 🤣😂🤣
-
So, my other car is a Škoda (but I can stop anytime). It has a really natty washer bottle cap, which I took off and tried on my A4 Convertible - and it fits fine. It looks like this closed... ...but opens up to become a funnel 👍 I bought mine for £8.99 from eBay here... Mike 😎


-
So, I decided that Friday would be a better day to do this - as my mate Dave was available to give me a hand today... I start off by breaking down the vast cardboard box the under-trays came in, and use it as a working surface to stop stuff getting on the driveway. I jack and axle-stand the car up, then lay out the parts and tools I'll need on the garage floor... I begin with a couple of easy jobs - replacing the £305 £19 hose 😆 - Beelzebub's spring clip was positioned by Dave with the biggest set of plumbers grips I've ever seen - the metal end was held in place by the clip built into the turbo... Then the main feed from the MAS to the turbo - I tightened the two 10mm bolts up using a short ratchet, as space was tight (plus I have hands like shovels). I used a trick a mechanic mate of mine showed me years ago to set the right hand bolt in place. I put a couple of layers of kitchen roll between the bolt and the socket, making it impossible to accidentally lose the bolt before you get it started... OK - time to get a bit grubby. I get under the car and unbolt the front engine mount from the block - colloquially known as the Snubber. As you can see, this is likely the original one, and is badly perished - in fact, it starts coming apart in my hand. I cut it off using a Stanley knife and bin it... It is remarkably easy to get the new bush on... ...and I manage to refit it, by carefully tightening each of the three bolts securing it in turn, saving me having to loosen the nuts on the socket... Whilst underneath, I reach back and undo the two remaining fasteners holding the damaged gearbox under-tray in place and bring it out... It seems to have a hard life... 🤨 I come up for air and fit the new battery cover in place - working as designed for the first time since I have had the car 😆 Next up - new fuel filter. I must go back and check the old one to see if it has a date on it - because I'm pretty sure it was the original...😱 There's an excellent tutorial guide on how to do this - pretty simple - job here. I fit the two remaining turbo hoses, from underneath the car, without any drama - my hands were too dirty to take pics, though... We start the car up - it took a long time for the diesel to get to the injectors via the new filter - and let it idle for a few minutes to warm the oil. It sounds way better already... 😃 This should be tightened to 25Nm - says so on the (plastic) lid. OMG - it was tightened to Godzilla hand tight. My oil filter socket started slipping - so we put a layer of cloth between the filter top and the socket for some extra stiction, which worked - but that was not 25Nm... 🤨 Once the oil was warm, we switched off and Dave volunteered to go underneath to drain it. A bit thin and watery, he reckoned. We changed the filter and O-ring - tightening to exactly 25Nm when done... 😃 Filled up with 3.8 litres of Quantum's finest, then started up again and checked for leaks. There being none, Dave, once again, nobly volunteered to get back underneath (I'm going to owe him so much beer) and fit the new gearbox and engine under trays - which at least had the advantage of coming with new fasteners. I must say, the quality and fit of these was a bit disappointing. Time will tell whether they are up to the task... 🤔 I started reassembling the top of the engine - replacing the air intake duct and - finally - fitting the engine cover. We removed the axle stands and then checked the oil - exactly on the 'Max' mark 👍 Time to take it out for a test drive. As soon as I drove out onto the road, I knew we'd fixed it. It picked up immediately, without any smoke and - critically - without any intake roar. I drove down to the A47 and drove about four miles in 4th gear - the revs around 4k, then turned off and stopped the engine. On restart, the DPF warning light had gone out - Yay! 🥳 I drove back home and ran the OBDEleven. As expected, it had numerous faults, but I just cleared them all and rescanned it. It came up with the expected three faults - all relating to the after-market radio I have fitted. Most importantly, it does NOT have a P2279 code... 😃 Job done. 👍 Thanks everyone for your help and advice - this place is a great resource. Mike 😎


-
Hi Steve, Julie, This video came into my YouTube feed the other day - I don't know if it might be useful to you? Cheers, Mike 😎
-
Hi Jack, I can recommend a powder coater in Norwich to you - BA Wheels Unit 12, Marriott Close Norwich Norfolk NR2 4UX 01603 610007 They will let you 'drive in and drive out'. They'll take your wheels off, remove the tyres, strip the wheels chemically, powder coat them in a finish of your choice, remount the tyres and balance them, then refit them to your car. Obviously this isn't a 'while you wait' service, 😆 but they are excellent at what they do. They did my Convertible's wheels for me six years ago, and they're still like new... I have no affiliation with them, other than being a satisfied customer. A friend of mine had his Alfa wheels done last year with similar results. https://ba-wheels.co.uk/
-
Hi SunshineSnoopy, Have you had any luck fixing the problem with your soft top? This appeared in my YouTube feed, so I thought I’d forward it to you… Mike 😎
-
-
Some more parts arrived today, including the final hose—what on earth makes this over £300 from Audi? 🤨 …the snubber bush… …and finally the new under-trays and fixings, which came in a vast cardboard box—the size of a chest of drawers—and are really substantially built. In fact, probably better than the OEM stuff. I'm still waiting for everything to arrive before going into battle—probably Thursday, I think… Mike 😎


-
Mine arrived in Norfolk from Cornwall(!) - no problem at all. What colour etc are you looking for? What year/model of car? Are your current seats electric (see what I did there)?😄 I think convertibles probably have a higher proportion of owners optioning full leather - weather protection etc, which may be why you're seeing more convertible sets offered than saloons and Avants...🤔 Mike😎
-
Fitted a set of leather seats in my convertible, that previously had half leather. I find it much more comfortable - no sticking to the seat so far - but of course the hood is usually down, and if it's not, the AC is generally on. I paid about £250 inc delivery from a vendor on eBay - didn't bother changing door cards. Sorry - haven't a decent pic of the seats fitted. It was a straightforward job - except where I made it difficult by fitting my own aftermarket seat heaters (you can see the controls by the gearstick). Don't ever be tempted to do this - the nightmares haunt me to this day...🤦♂️ Mike 😎

-
Parts have started to arrive (I was out, but was alerted by a text saying that parcels have been left in my "Safe Space" between my buns, which was a little worrying...). This one is the hose from the bottom of the intercooler to the gallery (the original is still in good condition, but I'm replacing it anyway)... ...and this one - Pipe Five above - which is the replacement for the hose with the split in it, running from the turbo to the gallery... Since I would have to lift the car onto axle stands to fit these, and it'll be getting warmish later (It's 22C now), I won't be refitting anything until I have all the parts here (including oil and filter, and fuel filter) - probably on Wednesday or Thursday next week, when it is due to cool down (temporarily)... Mike 😎


-
Yep- I went back through the paperwork and couldn’t find a fuel filter change recorded. I felt it was about time, after 105k miles and 16yrs… 😆
-
Thanks, Gareth 👍—I've just ordered five litres of Quantum Longlife Three, for £28; and a new oil filter, fuel filter and sump plug (I change these most oil changes, as the VAG ones don't allow you to replace the crush washer), for £30. There doesn't seem to be a YouTube guide to doing the oil filter on the BPW engine. I'll go into the garage tomorrow and measure the top of the container it sits in to see if I need to get a socket to fit. I'll also do a search for how to swap the fuel filter (which is a full cartridge type, so should be fairly simple). Updates on fitting these bits will be in the “Flashing Glow Plug light etc” thread. This car is going to be serviced to within an inch of its life by the time this work is finished… 😆 Mike 😎
-
Apologies if this has been beaten to death a hundred times before. I'm going to do an oil & filter change on the convertible next week, and thought that this from Halfords looked like the oil to use, being 5W-30 fully synthetic. Their website says it isn't - and they don't sell anything that is? I am assuming that this is an error on their website (mostly because they say they don't sell an alternative), but I may be missing something here. Also, I believe I need to order this filter: . ...rather than the shorter version with the tube sticking out of the top, for the BPW engine - is that correct? I've watched Gavin's excellent YouTube guide, but - although it's a 2.0TDi he's working on, I'm pretty sure it isn't a BPW... All help appreciated, Mike 😎
-
So - solutions to a couple of the side issues I've found. The under-tray is, frankly, a write-off. I have bought a new one, complete with a new rear (gearbox) under-tray for £65 delivered from eBay, including a fitting kit with all new fixings. I'm going to use copper-slip on everything when I reassemble. Let's face it, the fasteners there are exposed to all the weather the car goes through... I've found a new Bilstein front snubber rubber for £7 from Amazon. Replacement looks straightforward - excellent YouTube video here. The battery cover, which has been a niggle since I have had the car, has clearly got some lugs broken off the bottom of it (ringed) ...which explains why it doesn't sit in place. Once again, eBay is my friend at £18.50 delivered. More news as parts arrive...😆 Mike 😎


-
OK - a nice warm day with a cool breeze. I finished work early and popped to Halfords to pick up a pair of axle stands, a pair of wheel chocks, and a crawler pad. It's clear to me that this job needs doing from underneath. They're rated to two tons, which will be ample. Before jacking the front of the car up, I attack hose 5 - exhibit B above - as it's easily accessible from above. It's held in place by one of Beelzebub's spring clips at one end… . ...which is undone with a pair of water pump grips... ...and at the other end by a clip (ringed). To release it, you simply pull it towards you then push it down - this then releases the metal connector. It looks OK, but is very spongy and soft, so I am happy to replace it. This is the part that will cost you £305 from Audi - but £38.49 from eBay 😃. OK - easy bit done - time to get the trolley jack out... I carefully set the jack beneath the jacking point and pump it up until I judge I can comfortably (always a relative term) get underneath the car. I set the axle stand on its middle setting and then do the same on the other side of the car... I undo the QD fasteners on the under tray (a couple surprisingly hard to undo, bearing in mind it had recently been off to change the clutch) and remove it... It is filthy - all because of the lack of a clip on the bottom end of the breather hose. I'm going to put half a bottle of Fairy Liquid on it overnight, then power wash the gunk off tomorrow morning, I think... The hose from the bottom of the intercooler to the gallery (Hose 7 above) is dry and appears to be in good condition. It also appears to be the original fitment for the car, and likely hasn't been disturbed in 16 years. I take it off anyway, as I have a replacement coming... So - to the main event - Pipe 5 - Exhibit A above. The jubilee clip clamping it to the gallery had been downward facing, which is one of the reasons I'm lying on my back doing this job. Despite numerous dousings with brake cleaner, the whole area is caked in oily filth, and it soon looks like I am wearing elbow length black gloves... The top fixing (where it joins the turbo) is the same clip type as on Hose 5 (Exhibit B above). Once again, I disengage the wire clip, but the hose is less enthusiastic to part company with the turbo. Eventually, having disconnected the other end from the gallery, I manage to wiggle and rotate it sufficiently to remove it... Winner, winner, chicken dinner... There's a large split in the end, up near the turbo. This may well account for the loud intake roar I've been hearing and the other symptoms... 🤞 So - I just have to wait for the replacement hoses to arrive. Unfortunately, this will coincide with another period of very hot weather (31C forecast for Sunday), so it may be mid-week before I refit things. I noticed a couple of things when underneath the car. There is a second under tray, covering the gearbox area, and there's a huge chunk of it missing (presumably dragged off on a speed bump or something). I'll get a part number and see if I can find a used replacement. Also, the front bumper of the car has a series of rivets set into it. It looks like it used to have a front air dam or something - can anyone confirm if this was standard fit? I presume it was a casualty of whatever pulled off part of the rear under tray. The snubber rubber is quite perished. This doesn't look to be a difficult job to replace - is it worth doing - will I notice the difference? That's about all I can remember -- I'm going to have a long shower and then open a bottle of wine... Mike 😎


-
So, my parts guru came up with the information first thing today: Hose 5 8E0145834AR £305 😱 Hose 6 3B0145838A £99 Hose 7 8E0145837G £56 These are clearly made from refined unobtainium... I put the numbers into eBay and ordered: Hose 5 £38.49 Hose 6 £14.99 Hose 7 £19.99 Which means, using 'girlfriend logic', that I have already saved £386 😆 Incidentally, the metal gallery across the front of the car is £677 🤦♂️ The parts should start arriving on Saturday, so I'll likely pull the other ones out in preparation this evening. Mike 😎
-
-
So, here's the strange thing. He hasn't had to order a hex drive in as long as he can remember. This chap has been a mate of mine for 30yrs and isn't spinning me a line. He was tongue in cheek about the cost of a replacement engine (to make me look at it pragmatically). Replacing the hex drive will be an expensive job. I understand that one has to make a value judgement on these things - the hex drive certainly has a lot of anecdotal evidence of failures, but I'm not convinced that the extra work (especially) and outlay on the chain and sprocket set is worthwhile given my low mileage use and the age of the car... Sell me on the idea, Steve 😃 - I'm minded at the moment to just get the hex drive done... Thanks, Mike 😎
-
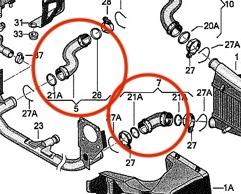
OK—cool enough this evening to get the convertible out of the garage and see if I can make some sense of where this air leak is. My prime suspect—Exhibit A: …is this guy which is a tight S shape (number five in this diagram). It has been drenched in oil and dirt for ages, since the breather hose lower connection was not held on with a spring clip. The oil and dirt you can see is after a good dose of brake cleaner. It feels spongy, although I'm unable to detect any splits or leaks from it in place. It's pretty easy to access, so I'll pop it off in the next day or so with a view to replacing it, whether it turns out to be the culprit or not… Next up—Exhibit B: On the face of it, this looks to be in good condition and I don't think it is causing the leak, but feeling underneath it, there is a really soft spongy feel to it. I think it's going to have to be replaced as well… Then there's Exhibit C : …which appears to be in good condition… …all the way to the intercooler. I can't get good access to the bottom of the intercooler to have a look at... ...pipe seven yet, as I ran out of time. Having said that, I can see a lot of oil and detritus down there, so it'll likely be worth replacing it as a precaution. I'll search for parts and prices this evening. Before I go, though—can anyone explain how the battery cover is meant to work? I can see it has a spring thing on one of the terminals... …which common-sense would say was to put some pressure onto the lid as it slots into place… Except mine doesn't slot into place. It just floats about. Has mine been broken or something? Not a big thing, but it bugs me a little… Cheers, Mike😎


.thumb.jpg.15c990118a6d8a23731e923830833b73.jpg)


.jpg.9ad3e201c4a5a2499fc024dc32f4e0b9.jpg)

