

Steve Q
Moderators
-
Joined
-
Last visited
Everything posted by Steve Q
-
Does the gearbox have an oil cooler? If so could that be the problem? When was the gearbox oil last changed?
-
Unfortunately most of these warranties aren't worth the paper they're written on. My advice would be to source s second hand gearbox or get a second opinion.
-
35mm should be fine. Go for a springs and shocks package not just lowering strings. Bilstein kits are supposed to be very good (b12 pro)
-
If you are having trouble with your indicators or hazard lights it could be due to a failing indicator relay which is part of the hazard warning light. Audi part no. 4b0941509DB98. Cost £22.78 from Audi. Here's a guide on how to remove the old and replace it with the new. So here goes: Use a small thin screwdriver to gently prize off the dash surround around the hazard warning light switch and cupholder. Then use a flat screwdiver to prize out the hazard warning switch towards you away from the dash. Unplug the din adapter at the back and replace with the new. refit the dash surround. Simple job and took about about a minute. Hope this helps if any of you come across this fault.
-
Mention a clay bar to most non-car folk, and they will probably stare back at you blankly. A staple for detailing shops and enthusiasts alike, it is quite literally a piece of malleable clay that removes contaminants picked from everyday driving like bits of brake dust and road tar. It’s a great idea to do this before waxing because it will ensure the paint is smooth and clean before applying a protective coating. Below is an easy step-by-step guide on how to properly clay bar your ride. Give your vehicle a thorough wash and dry before starting to remove loose dirt and grime. Your clay bar kit (like this one, from Mothers) should come with a big rectangular chunk of clay. Rip off a piece big enough to fit in your hand and reseal the rest in a Ziploc bag. Warm up the clay by kneading it in your hands, and then generously spray the supplied lubricant onto the panel of the car you’d like to start with. Take the clay and gently glide it back and forth on the lubricated panel. It should slide effortlessly, there’s no need to apply too much pressure. If the clay starts to stick, spray on more lubricant. Wipe the area dry with a soft, clean towel afterwards and run the back of your hand along the paint, which should feel like glass. If not, start over again. Examine your piece of clay — it’s likely looking a little dirty. When it looks a lot dirty, fold it in half and massage it until you have a clean side to work with. Repeat this step for each section of the car. I like to start with the roof and work my way down, from front to back because the bottom part of the car tends to be the filthiest. Hatchbacks and wagons also tend to accumulate a lot of grit on the lift gate so you’ll want to spend some more time there. After you’ve gone over the entire vehicle, it’s time to seal in the shine. Grab a bottle or can of your favourite wax and finish the job. See How to wax your car in three easy steps. https://openroadaudi.com/blog/using-clay-bar-detail-your-car-step-step-guide
-
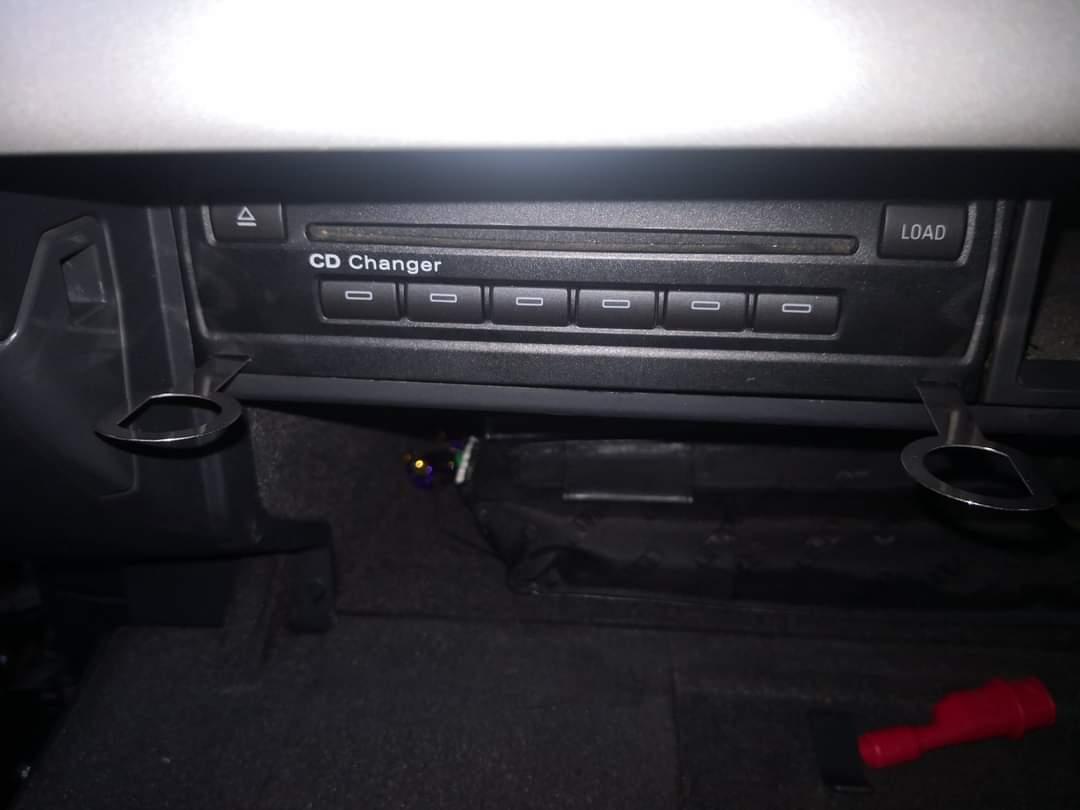
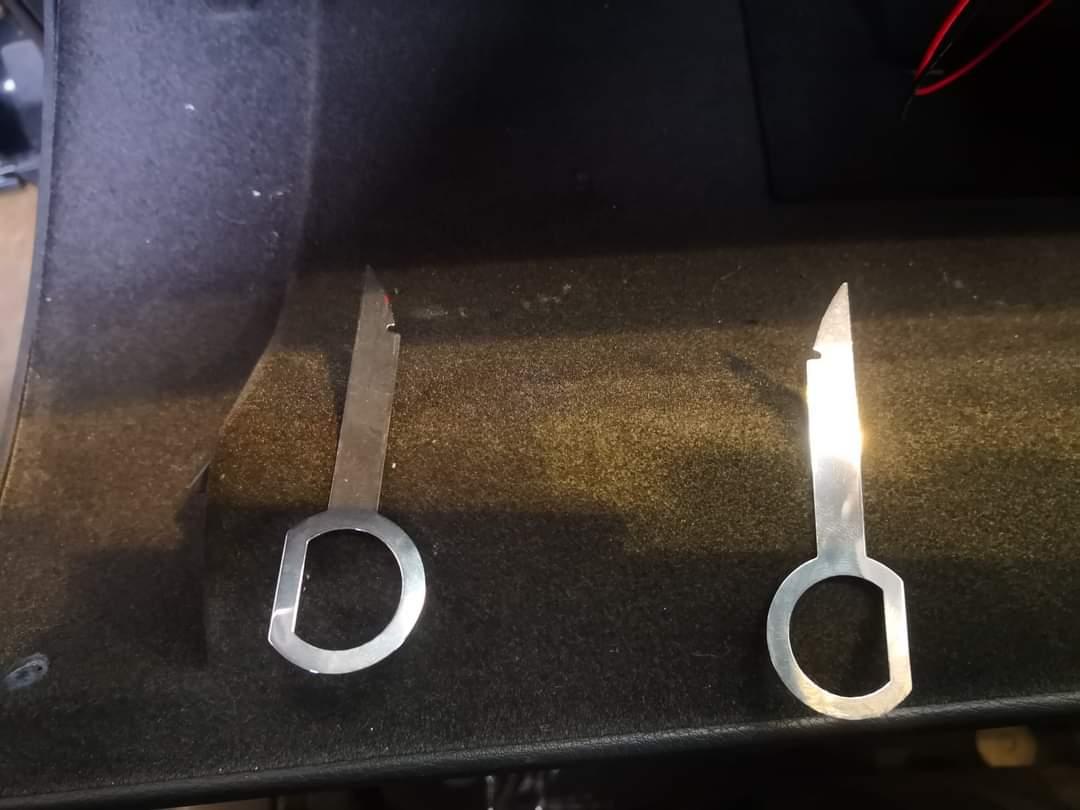
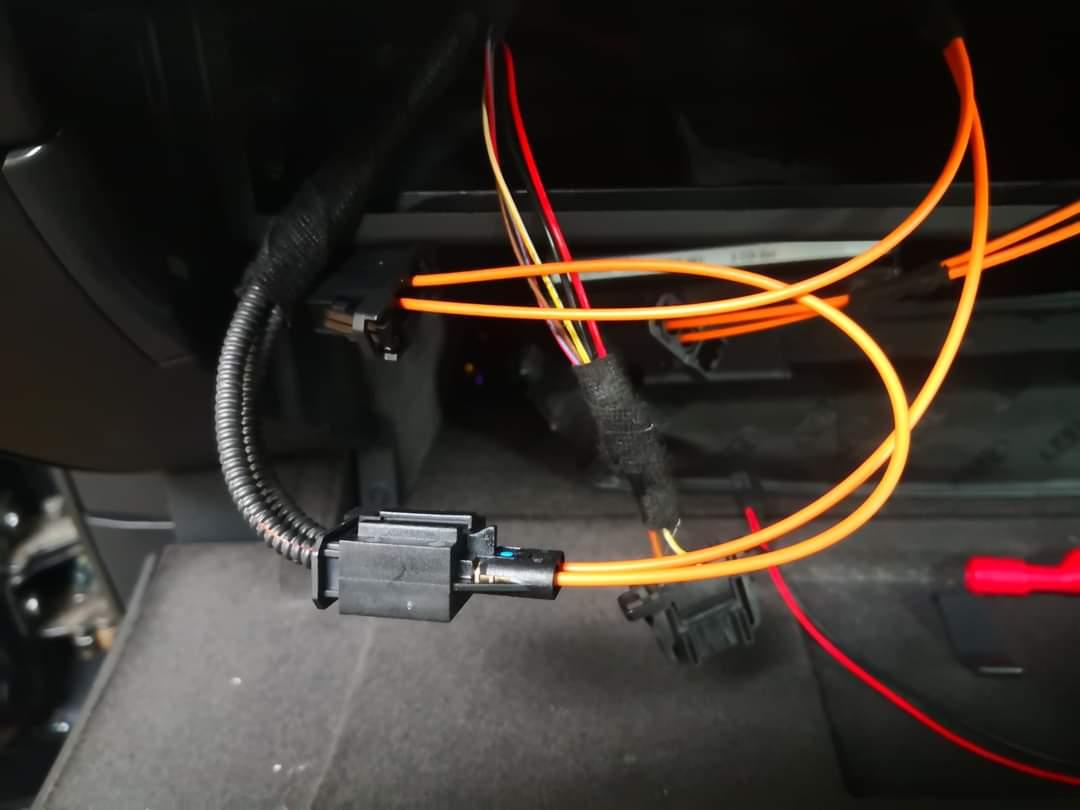
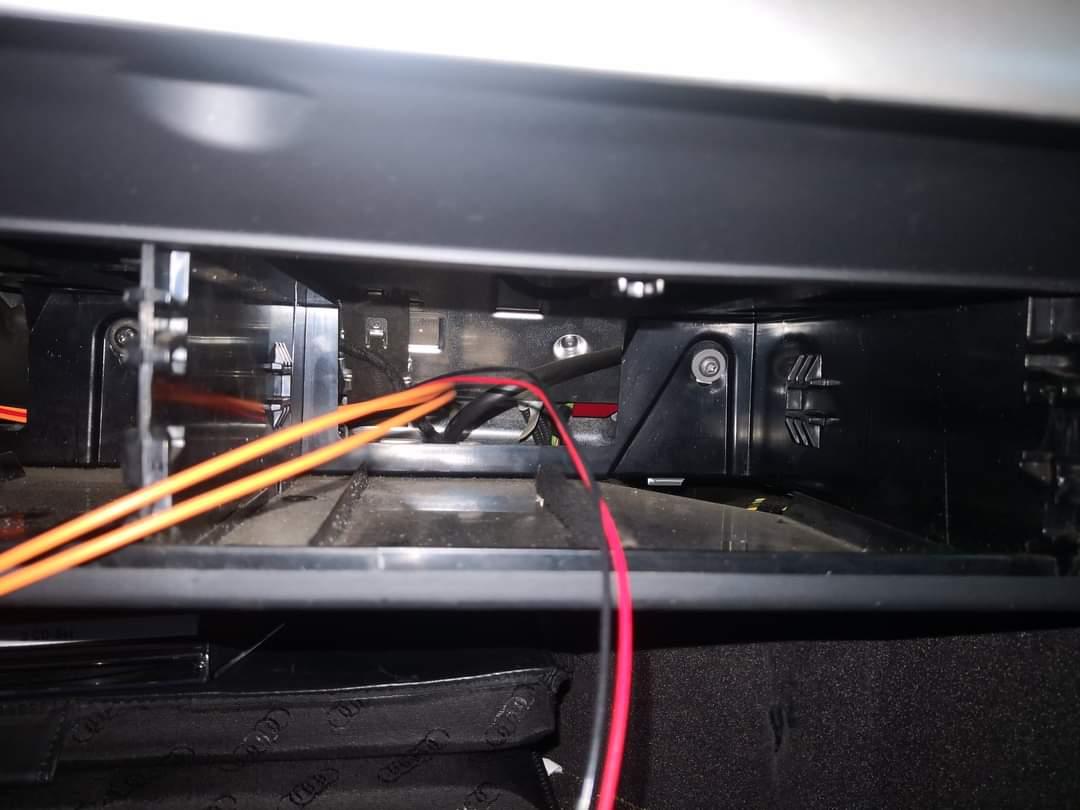
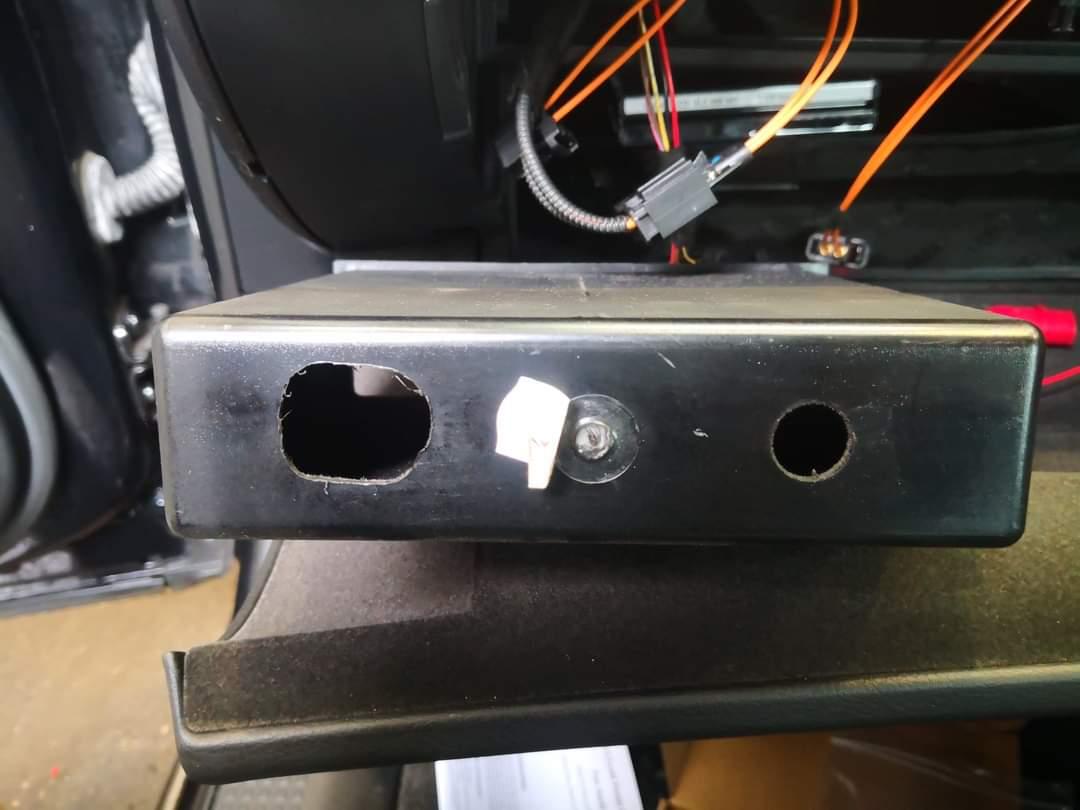
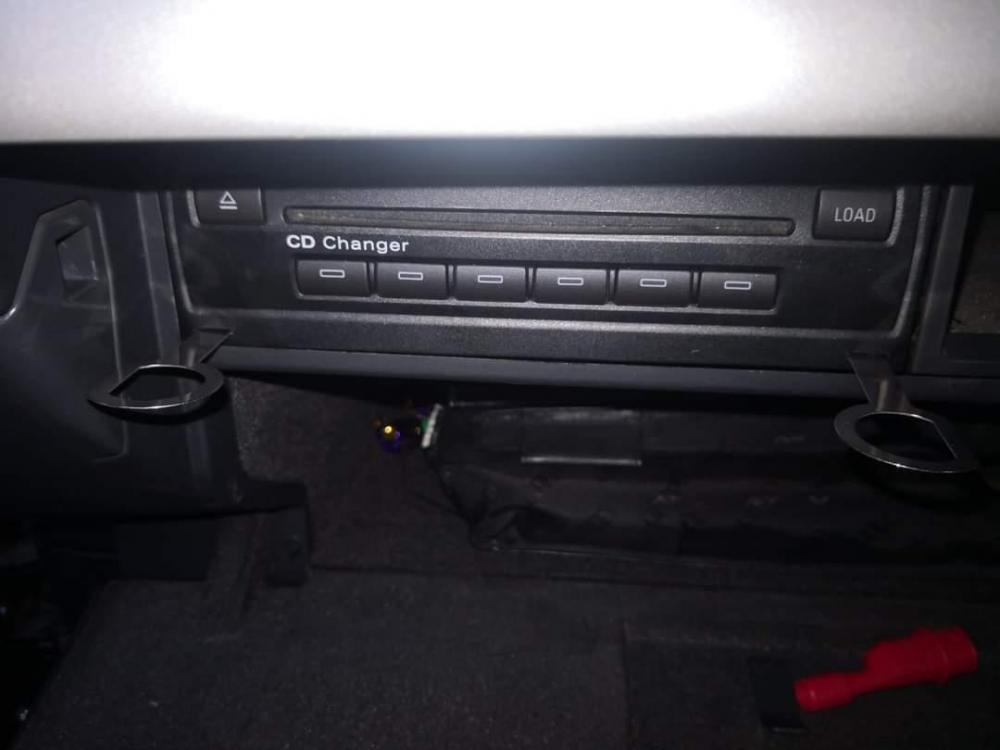
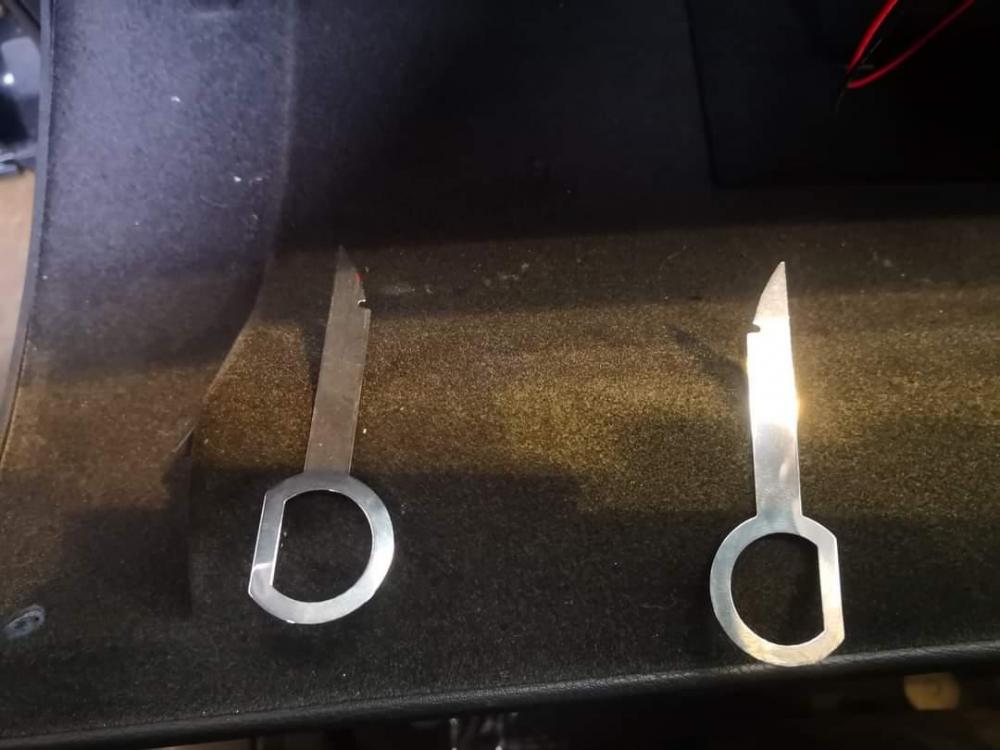
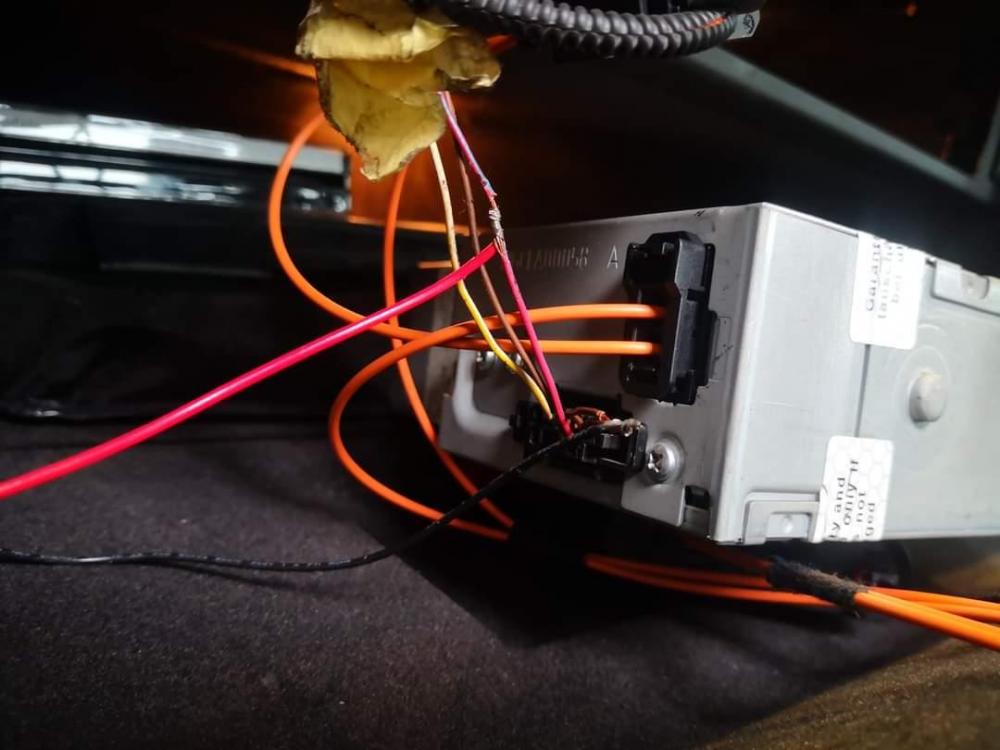
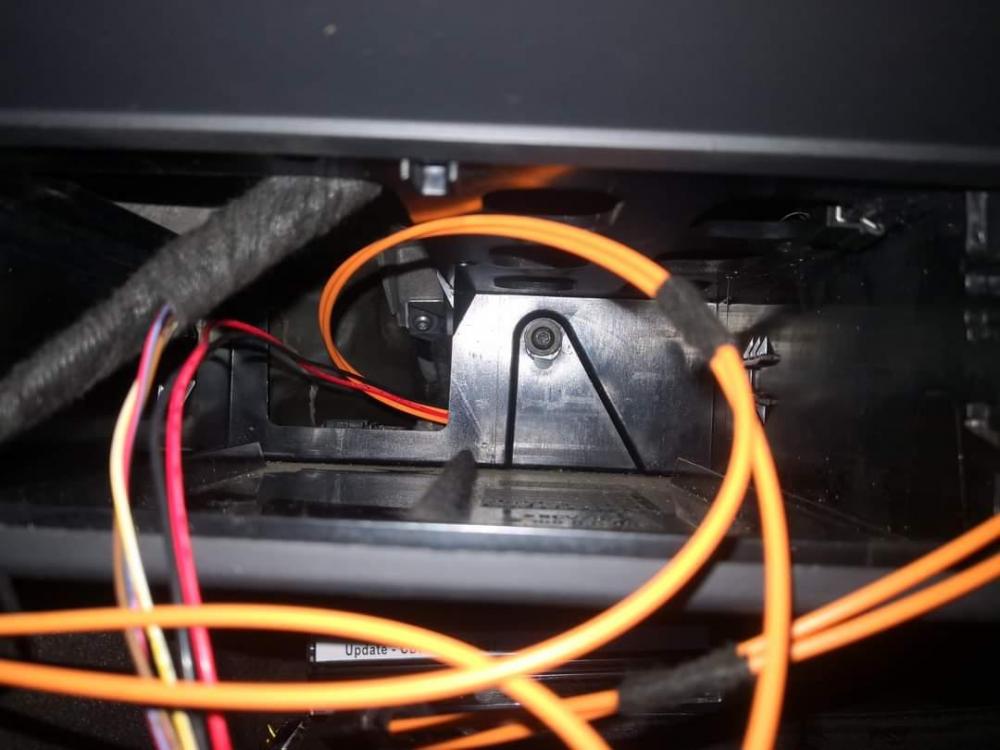
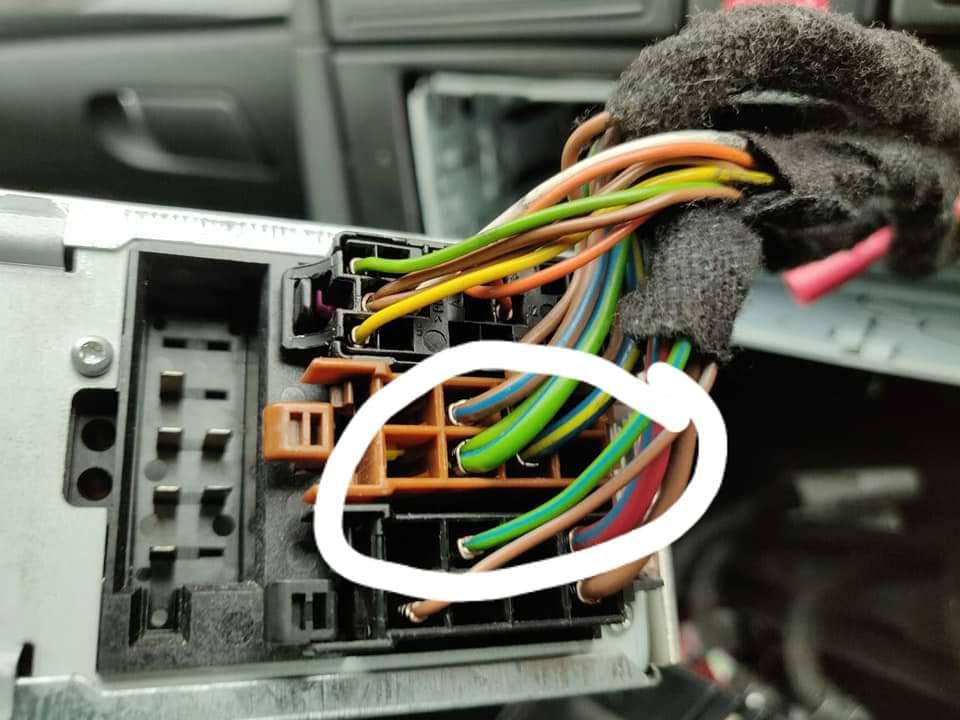
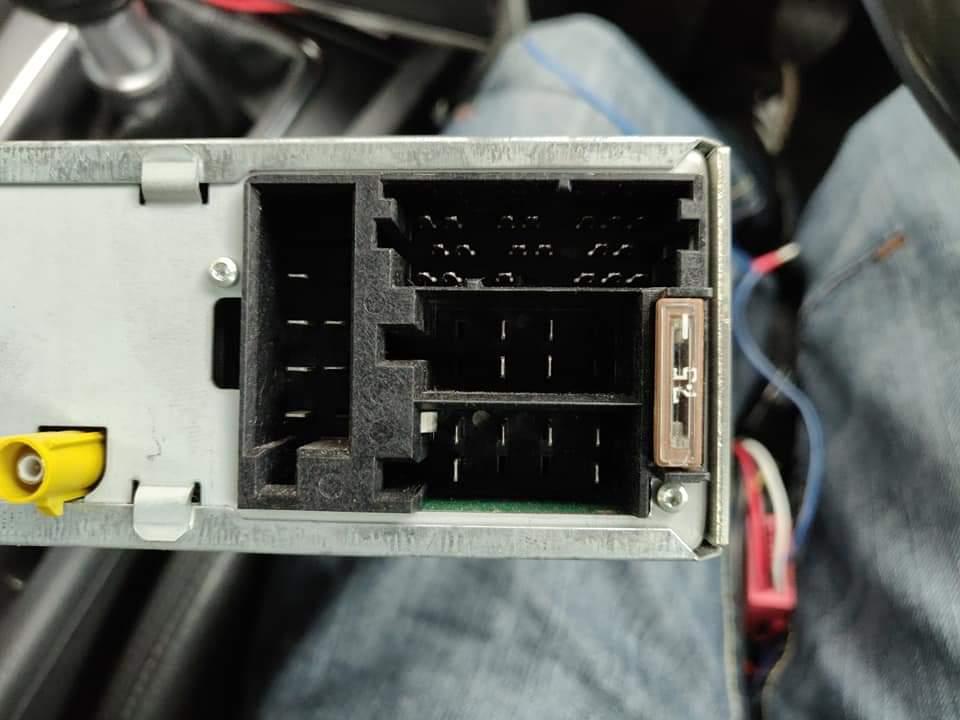
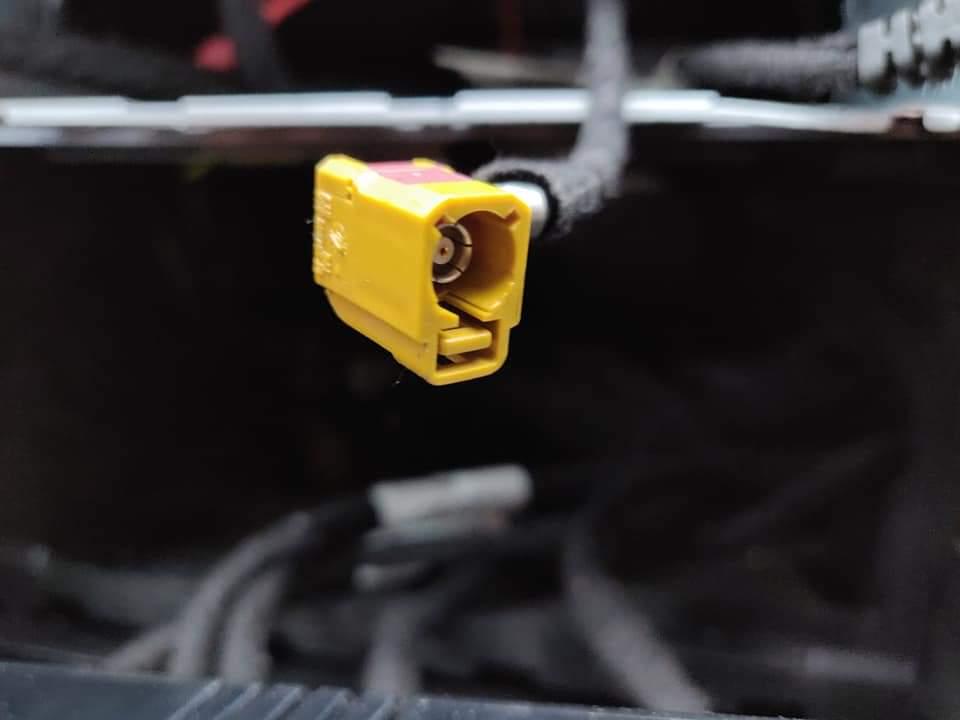
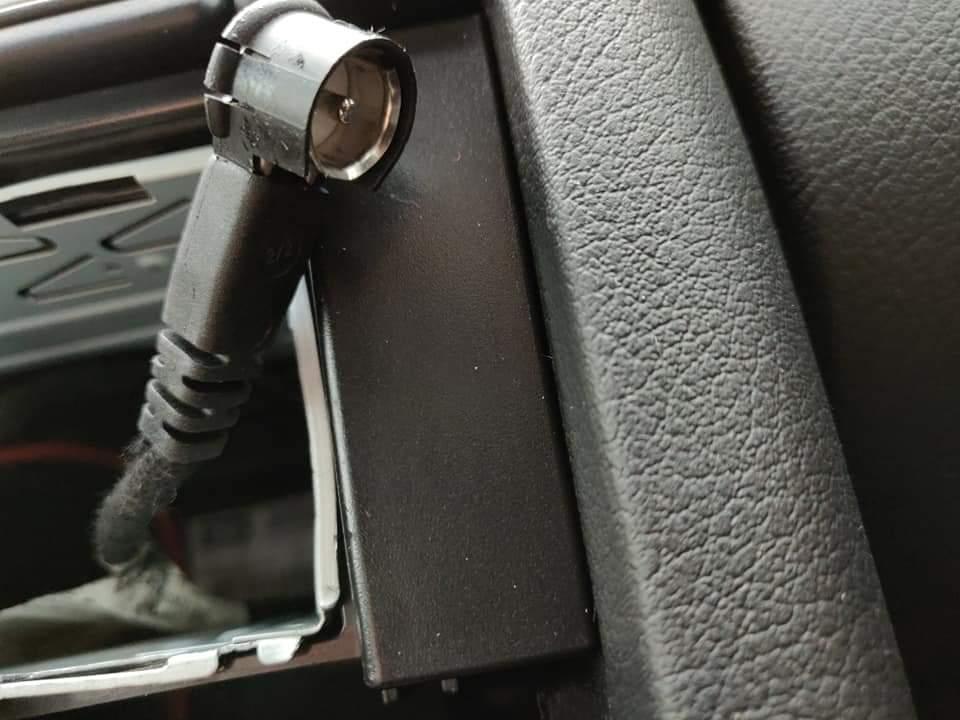
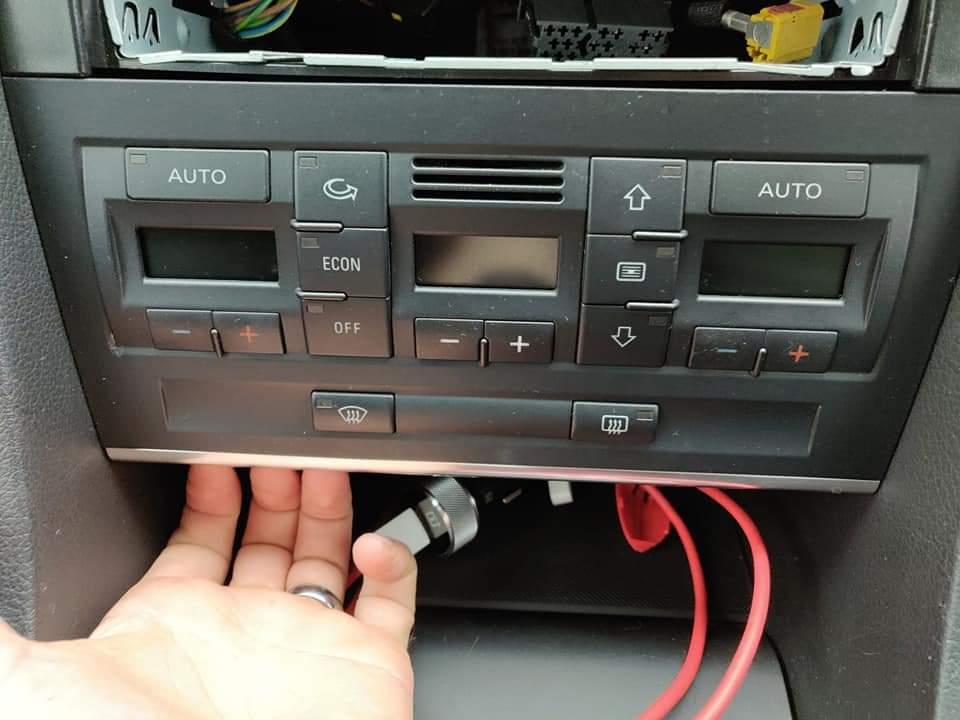
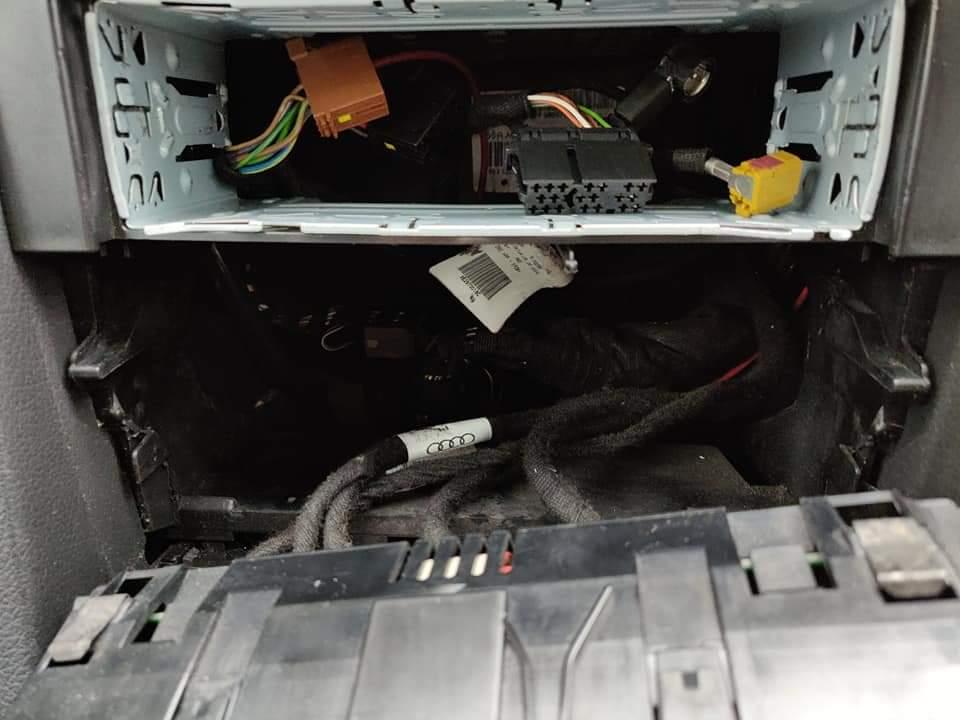
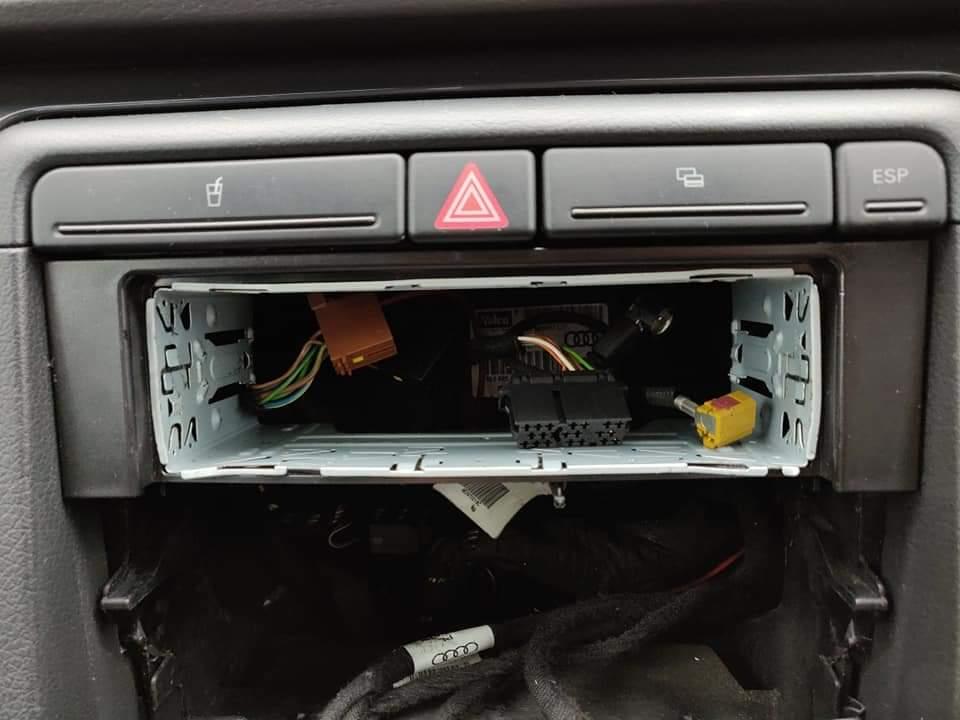
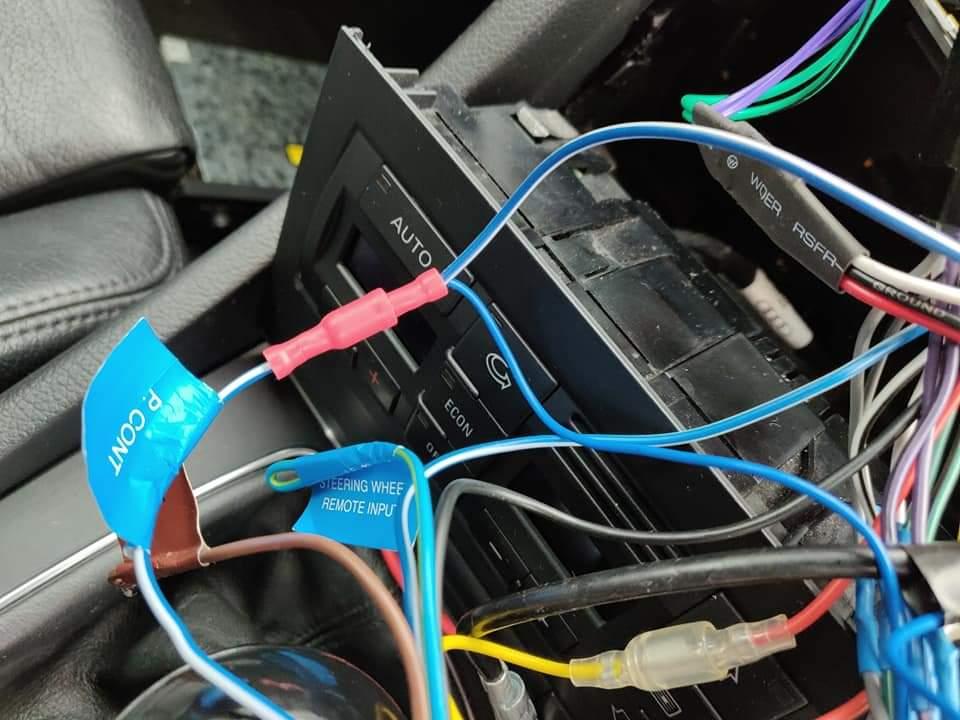
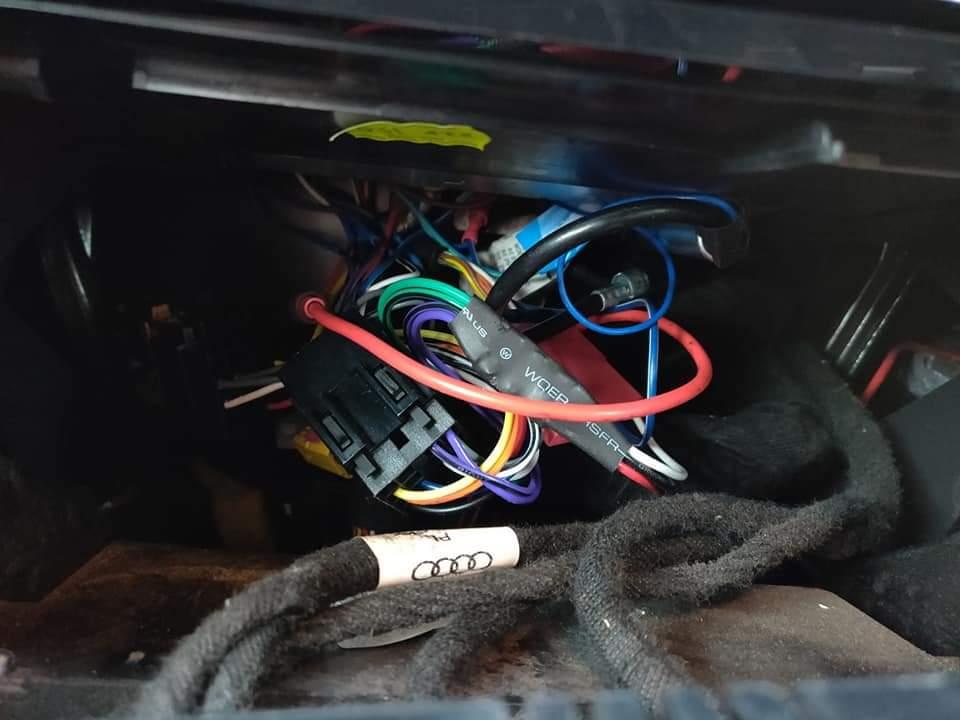
Alex Rogers: Mr12Volt Adapter Retro Fit; My goal was to get aux/usb/bluetooth integrated with the OEM audio system. A friend recommended the Mr12Volt module so got one ordered. Fitted it today and wanted to write a guide for anyone interested. Firstly, the kit comes with everything you need. You can even buy a power cable adapter so it truly is plug and play. I didn't get that so I'll show you what wires to tap into. Photos 1&2; With the supplied keys, remove the CD changer. Push the keys in as shown in photo 2, they should click into place about 15mm deep. Then gently pull outwards and towards yourself. Photos 3&4; You'll be greeted by 2 plugs. One is your power supply and the other is fibre optic data stuff. On the power cable, you'll see 2 brown wires. 1 coming from the loom and another looped through 2 pins. I chose to cut the loop and join our black, ground wire for the module. The red/blue wire is your power. This gets connected to the red wire of the module. In the module kit, you'll have an orange adapter loom. Unplug the fibre optic cable from the module and plug the adapter loom in respectively. Use the long part of the adapter to loop round above the glovebox shown next. Pics 5&6; Next to the CD changer slot, I had a storage compartment. This just pulls forward and can be removed for now. Looking into the slot the CD changer sits in, pic 5, I routed the cables behind the glovebox and fed them round the back into the other slot, pic 6. This allows the cables to sit out the way without making new holes. Pic 7; This is the back of the removed storage compartment. I had to open up ones of the holes to allow the fibre optic adapter to come through. I used a dremel, but a step drill bit would also work. Now you can feed the wires through and slot the storage compartment back into place. Pic 8; Installation finished. In the kit, you are given 2 pieces of 3M tape. I stuck the module to the storage compartment, then pulled the excess cable back through to the CD changer side. You can then slot the CD changer back into place and you're done here. Extra info; There is a microphone in the kit, I haven't routed this yet but it plugs into the back of the module for bluetooth calls. To use the module, select CD/TV under the Radio button on the car. I believe some buttons say CD/Aux. Turn the bluetooth on on your phone, and connect to the module. Then play away! I am seriously impressed with this kit and couldn't be happier. Simple to use and simple to fit. Thanks!


-
Oh of course it hasn't! I was thinking of the 1.8T for some reason lol.
-
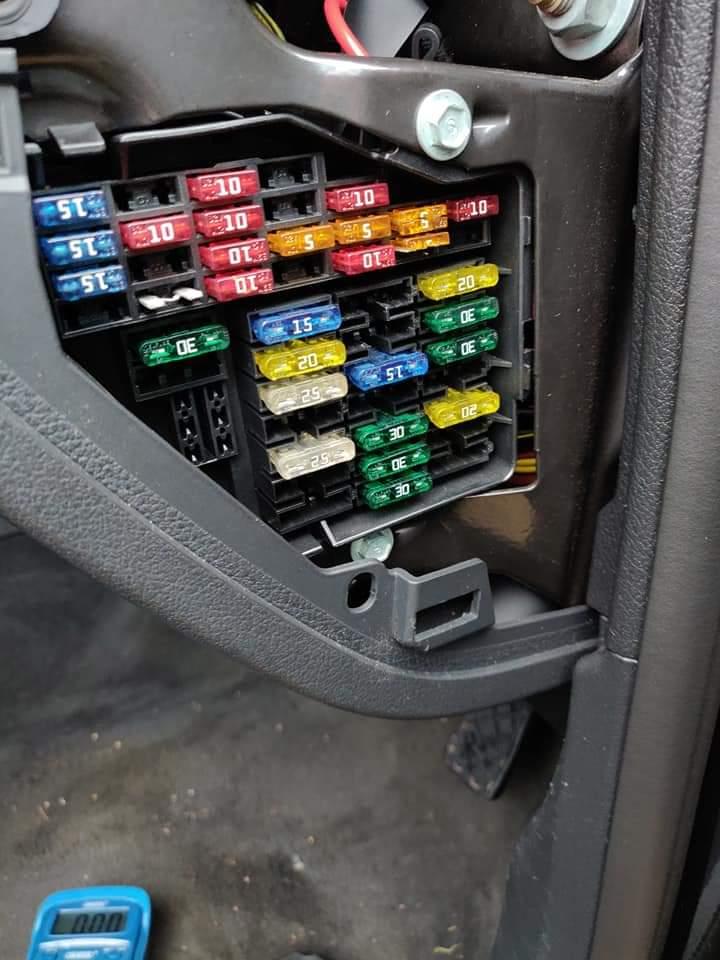
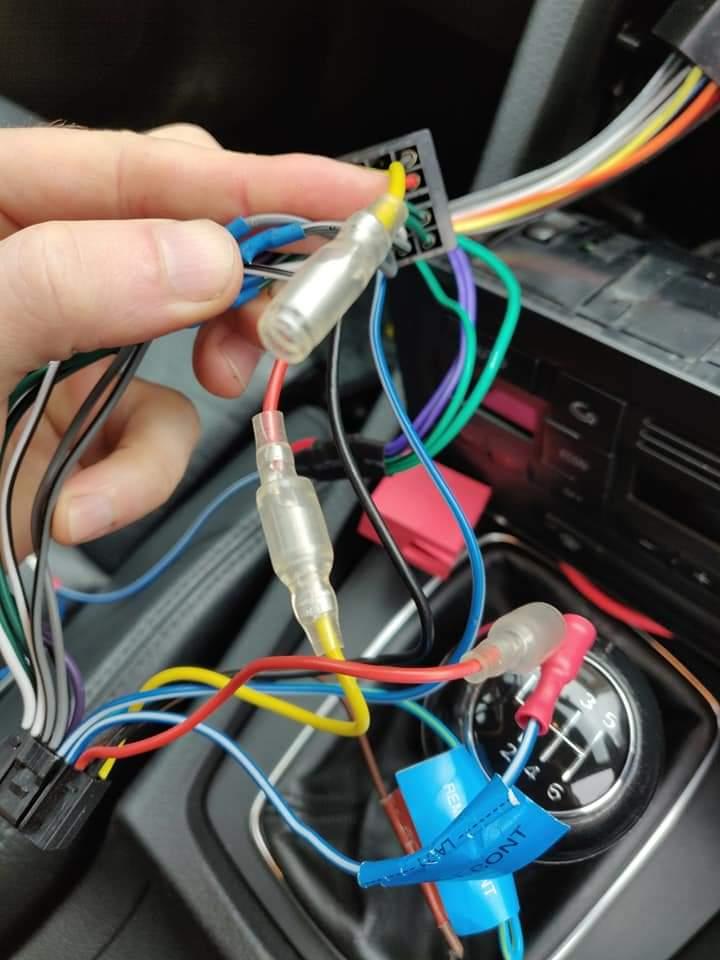
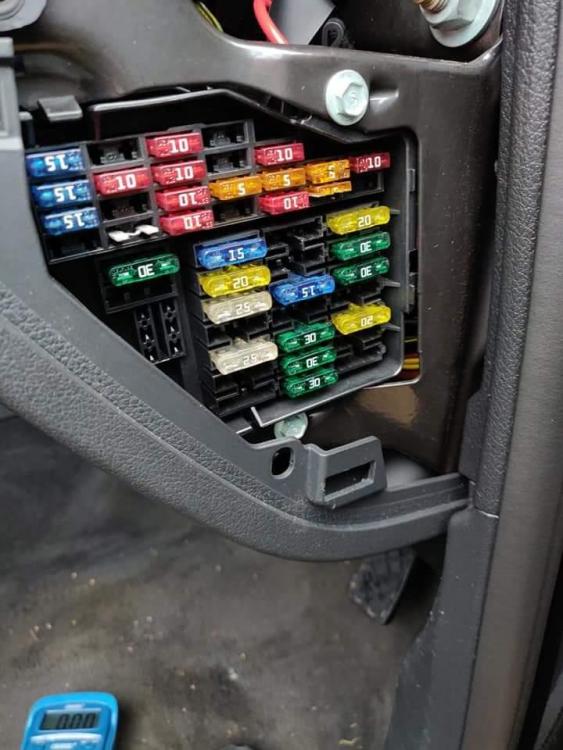
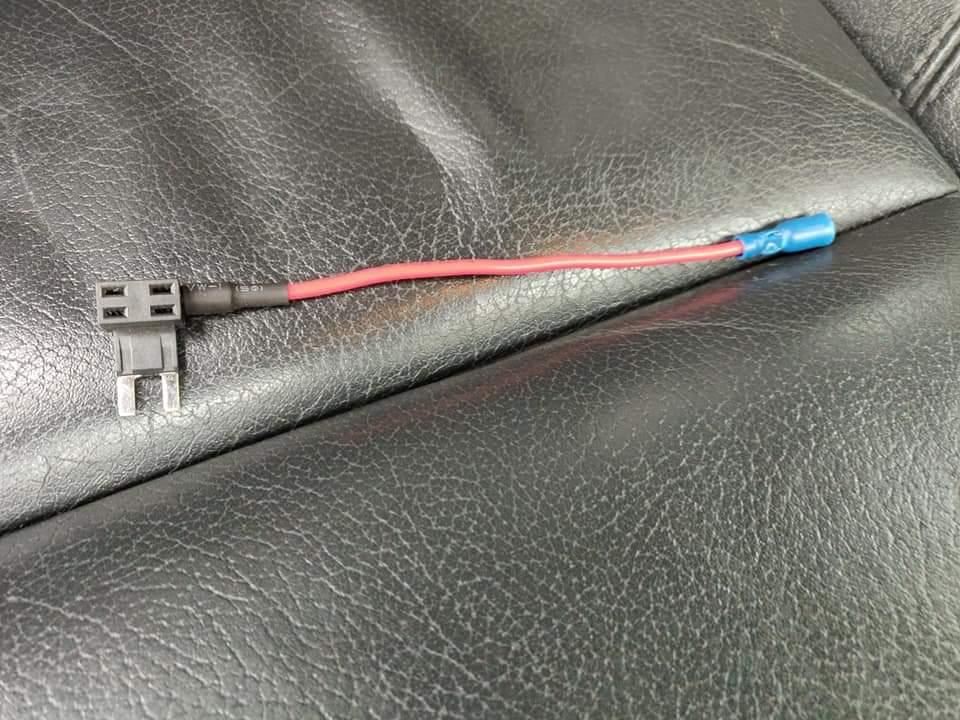
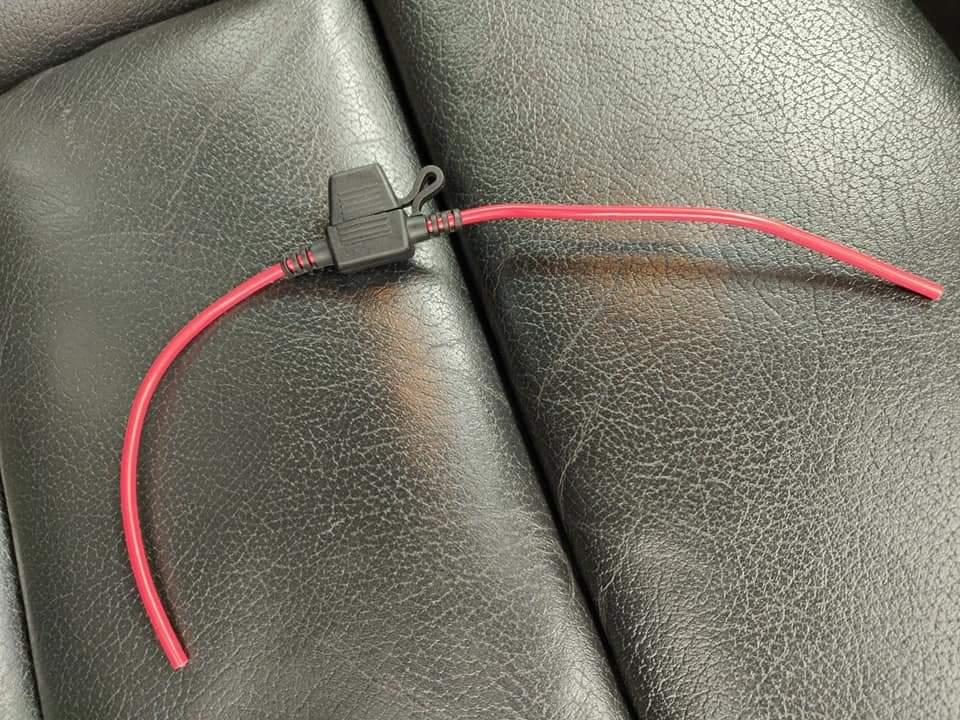
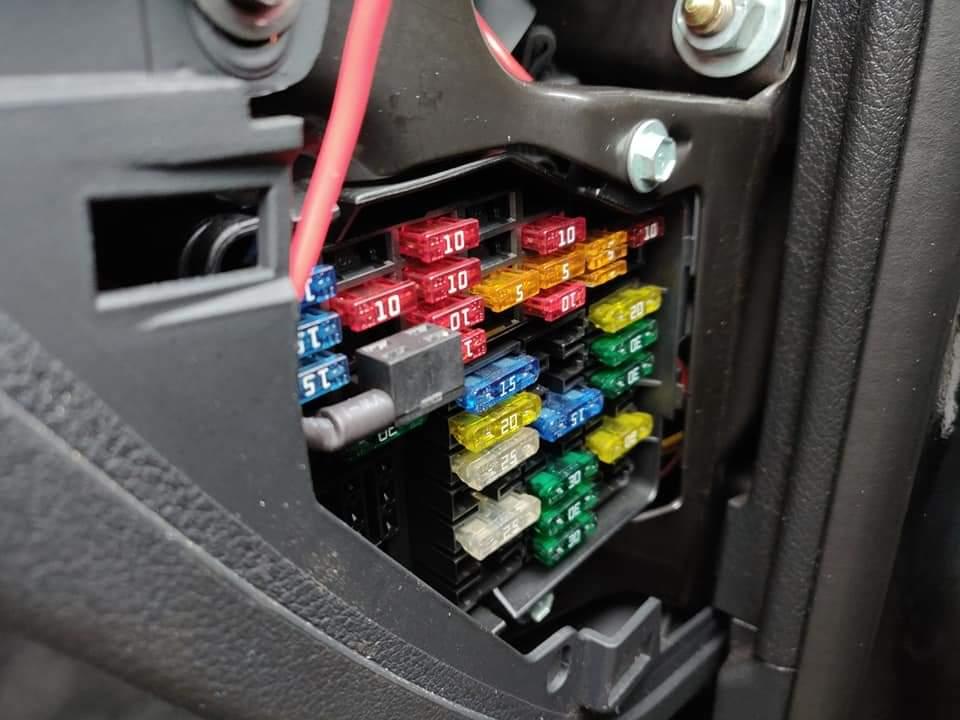
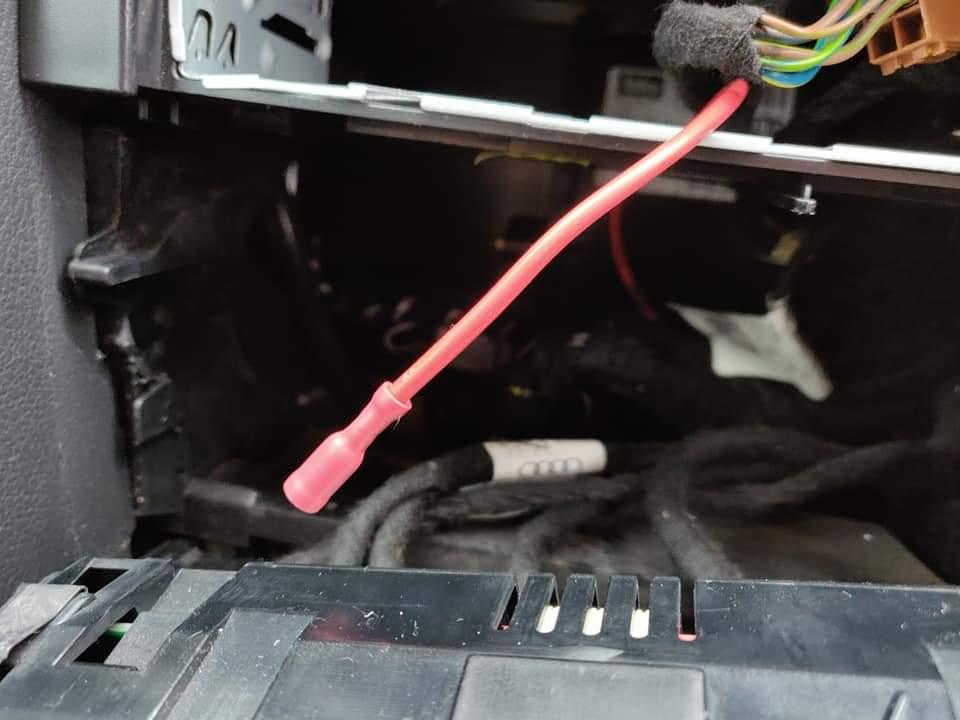
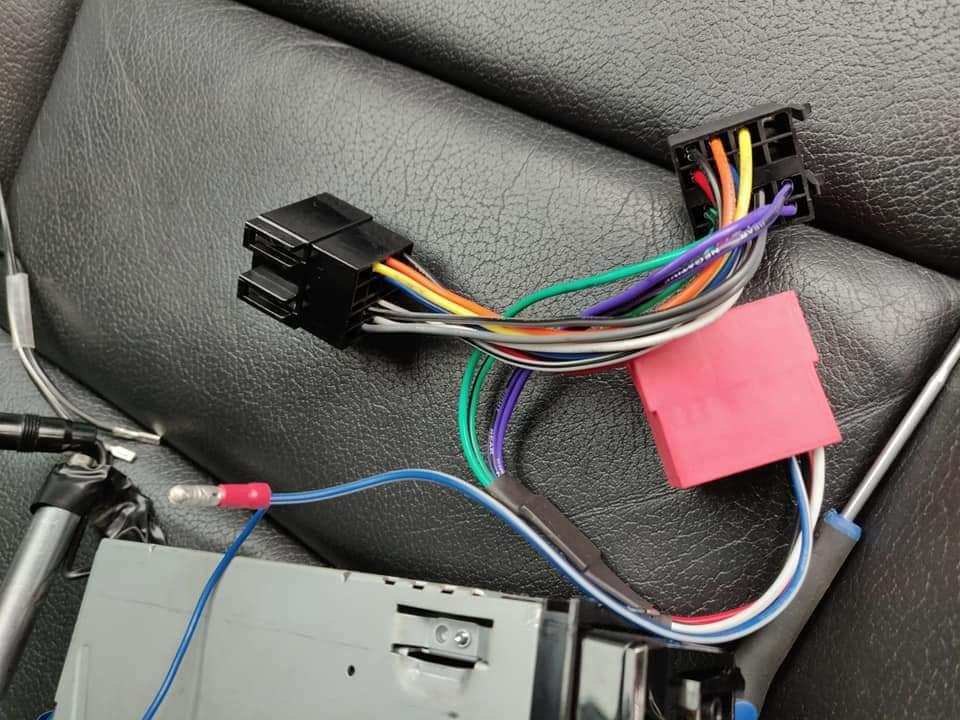
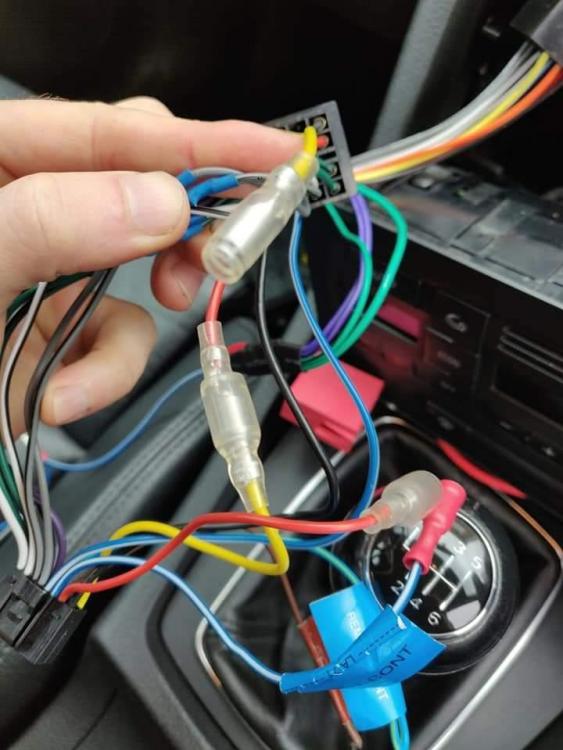
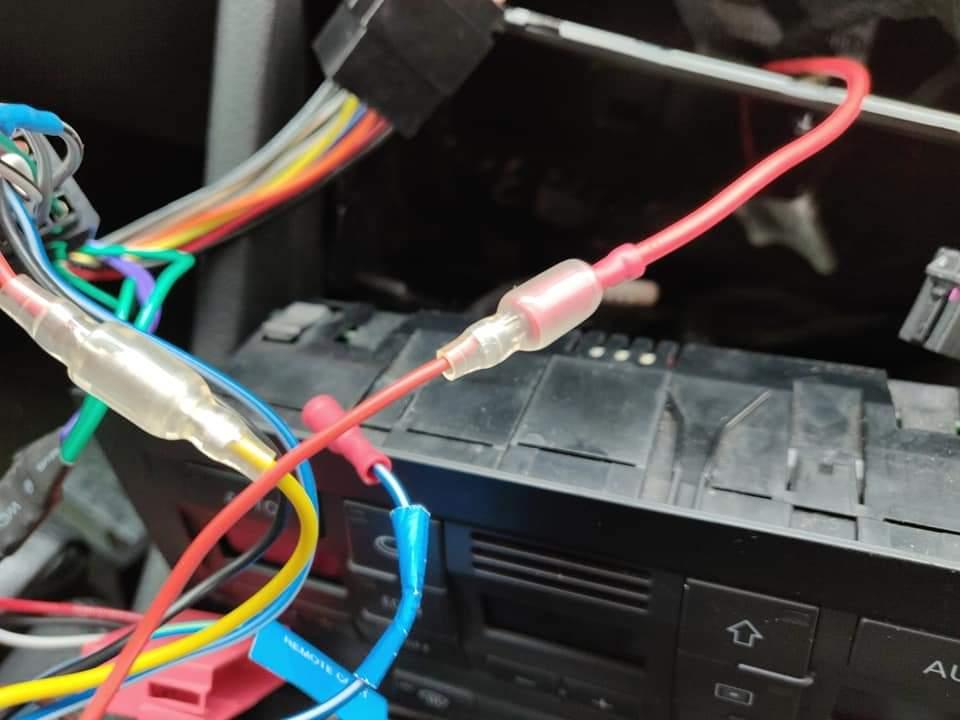
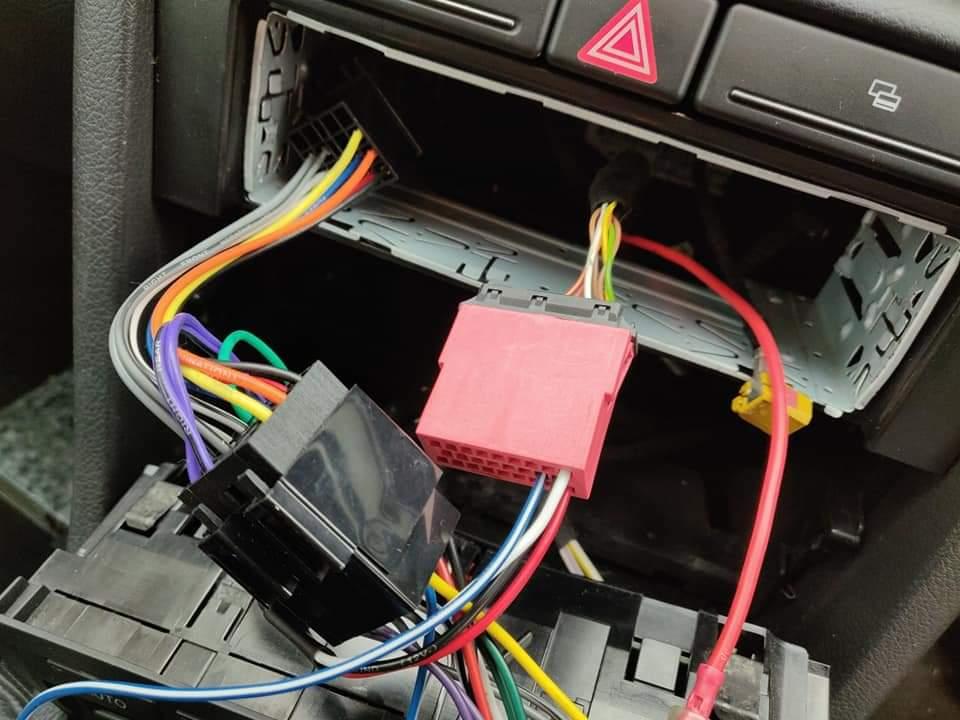
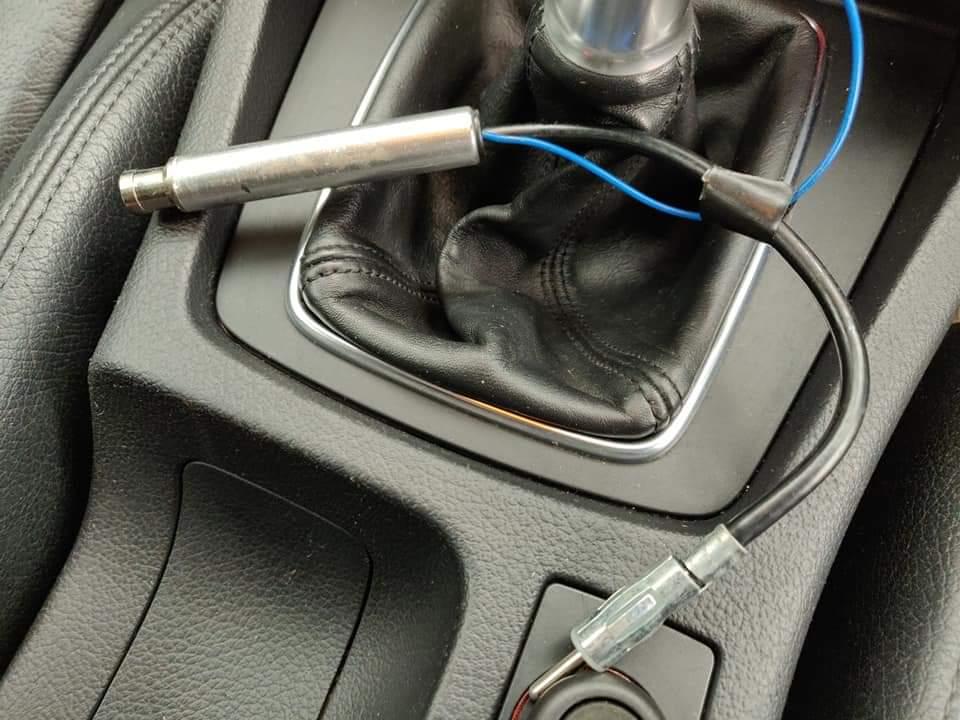
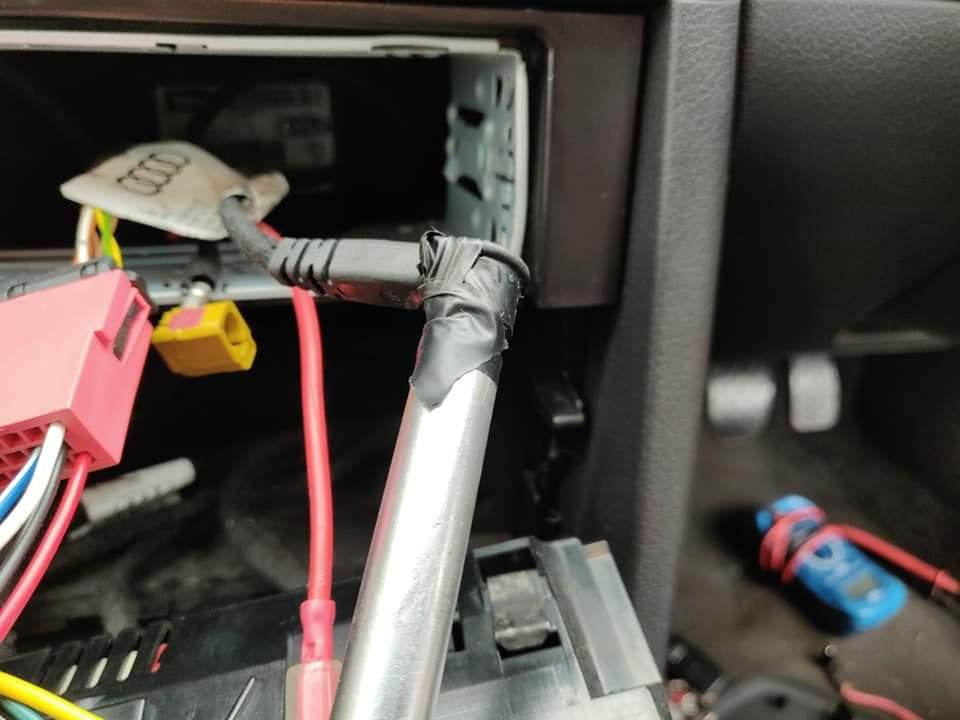
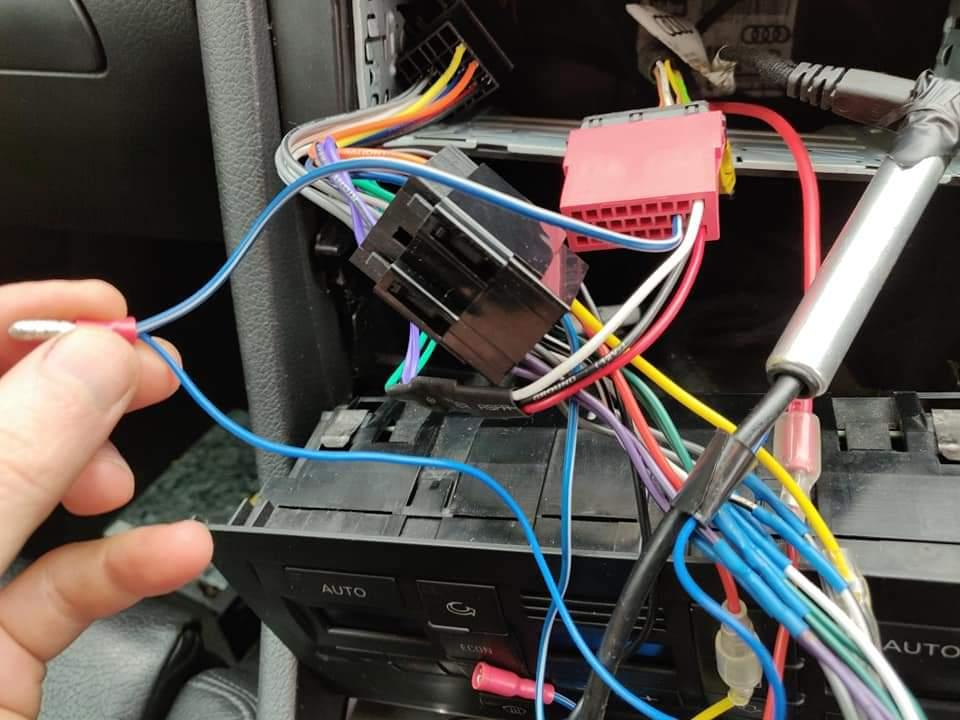
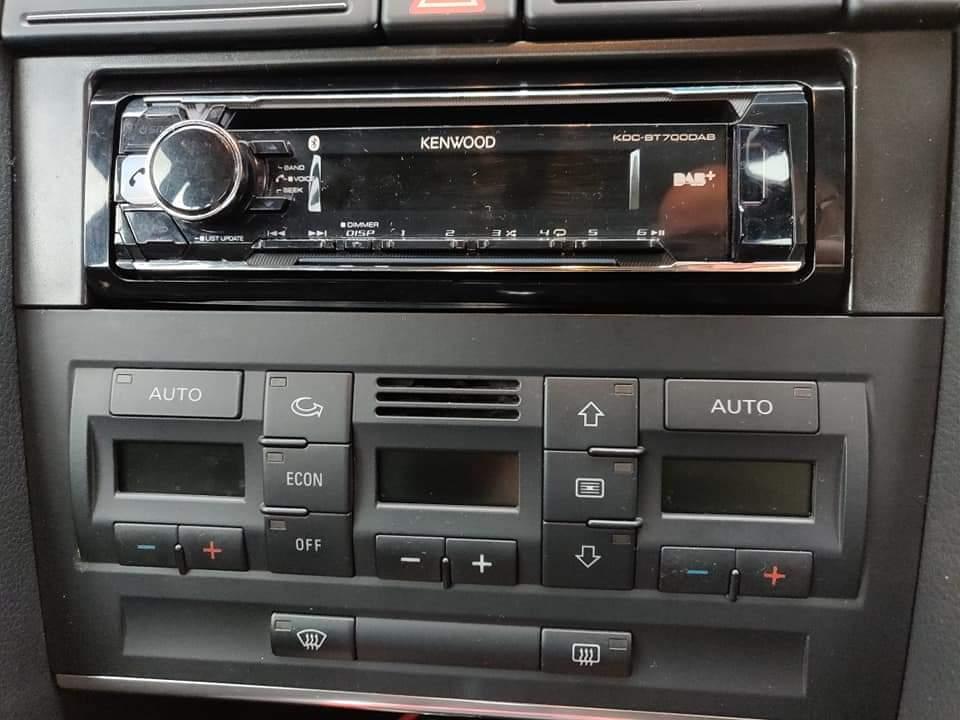
To all those looking to install a new radio into their b6. Here is a little guide for you. Firstly you will need to remove your radio to find out which system you have. There are two main configurations. Half amplified (rear) and fully amplified. Whether it is Bose or not doesn't really make any difference with wiring up. If your car has a brown plug with four holes used then you have a half amplified system. If you have no brown plug then it is fully amplified. Don't be confused with the amount of harnesses available. There are only actually two. But different manufacturers and options make it seem like there are loads. Basically if you have a half amplified system you will need Autoleads PC9-401/ PC9-404 or Connects2 CT20AU09/CT20AU10 If you use either of the second options you will need to make sure your new radio has a set of pre outs (RCA connections) If you have a fully amplified system then you will need Autoleads PC9-410 or Connects2 CT20AU11. If you have a fully amplified system you will need a radio that has 2 sets of pre outs (RCA connections) on the back of it. The main problems people come across when fitting their new radio are the radio not powering up. Poor radio reception and no sound. Audi didn't make it that straight forward to install an aftermarket radio. Basically there is only a single permanent feed to the radio and then the radio senses when the ignition is on and switches internally. When you add an aftermarket radio you have to put in a new ignition feed so that the radio turns on and off with the key. This can be done two ways 1. by using a piggyback/add a fuse (see pictures) or 2. an online fuse (see pictures) Option 1 is the easiest. You can get a piggyback fuse from Amazon/eBay/Halfords. You will need one for a mini fuse. Basically it replaces the existing fuse and adds a line out for another accessory. In the case of the b6, fuse number 19 (front fog lights) is an ignition feed. Take that fuse out and put it into the piggyback fuse on the closest space to the silver folks. Then put a 10amp fuse in the other space on the piggyback and place piggyback into the fuse box as shown in picture. Option 2 is to connect a inline fuse to the feed to the back of the light switch but you have to solder it in so option 1 is easier. You will then need a about a meter of electrical wire rated somewhere between 12 and 20 amps. Connect one end to the piggyback and then run it through the dash and out of the radio hole in the centre console. Audi's have 2 aerials, both in the rear windows. There are two connectors on the radio one is a Fakra connector and the other is a standard aerial connector. (See pictures) Both aerials run through a booster in the car. When you fit an aftermarket radio the booster no longer works so you have to buy an aerial adaptor that is powered. You can either use a Fakra one or standard one. I used a standard one which is Autoleads PC5-90 for a Fakra one it would be PC5-137. With regards to no sound, this is because you need to send a signal to the factory amp to turn on. The new harness will have a blue wire coming from it. This needs to be connected to the blue and white wire of the new radio harness. On the new radio harness you will have a red wire and a yellow wire. Red is ignition and yellow is permanent feed. The Audi wiring has the permanent feed in the wrong place so you need to swap the wires over but only the yellow wire coming from the radio to the red wire coming from the car. The red wire coming from the new radio then needs to be connected to the new wire that has been run from the fusebox. The aerial booster and amplifier blue wires need to be connected together and then connected to the blue and white wire coming from the new radio. This should then allow your new radio to work once everything is connected up. The only thing that may be annoying is the radio will turn off as soon as you stop the engine and not when you take the key out like the standard one does. There is a steering wheel module you can use that will create an ignition feed for you. It may also keep the turn off when key removed feature but not too sure on that. If you are happy to spend the extra money the connector is Connects2 CTSAD001.2 this is a plug and play harness. I have attached pictures to help you all and hopefully I have covered the installation process enough. Matthew Hellard.

-
Good luck, please keep us posted on how you get on 🙂
-
As the title says please see attached the dpf doc for fitting fistune dab to mmi 3g/3g+ Hope it's useful 🙂 EN FISTUNE Audi MMI 3G_3G+.pdf
-
As the title says please see attached the dpf doc for fitting an aux to an A4 b8 & A5 on the same platform. Hope it's useful 🙂 AUX_ohjeet_audi.pdf
-
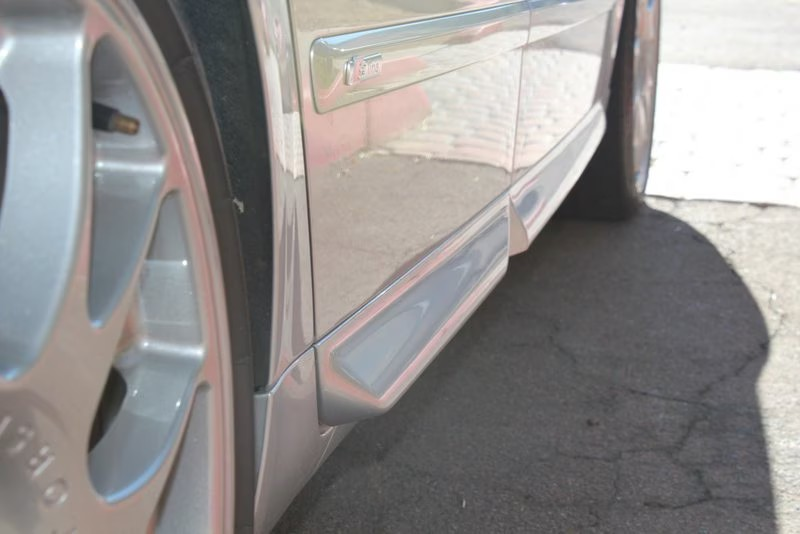
Guide credited to Nick Roshon. One interesting design cue in the B6 / B7 (2001.5-2008) Audi A4 and S4 is the door blades – these fins protrude from underneath the door and give the car a more sporty look that is uniquely Audi – you won’t see door blades like this on any other car. There are three styles of door blades you can install on your Audi A4/S4, and they’re all universal between B6 and B7 body styles, as well as A4, S4, and RS4 models in the sedan or avant format (the convertible does have different door blades however). The three styles are: Audi A4 Door Blades – completely flat and they do not poke out from the side skirt at all. Audi A4 S-Line or USP (Ultra Sport Package) Door Blades – these look like the S4 door blades (above) only smaller and less aggressive. Audi S4 Door Blades – the most aggressive of the three, these door blades stick out the furthest from the body and have the sharpest angles. To install or swap door blades from one style to the other is very easy – all you need is a phillips screw driver, and you can swap out all four in under 20 minutes. There are two screws on the bottom of the door, which is all you need to remove, and then the door blade slides out. Here are a few pictures & step by step instructions on how to install & swap out a door blade (it is the same for all four doors). Installation Guide Step 1 – Remove the two screws on the bottom of the inside of the door. One is on the outside edge, one on the inside edge. And here is the other screw: Step 2 – Slide out the door blade. The door blades slide in and out, so simply pull the door blade outward away from the car when the door is open and it should slide 4-5 inches and the fall off. Step 3 – Slide on the new door blade and insert & tighten both screws again (basically, steps 1 & 2 in reverse). You’re done! Installation is easy and there is no doubt the door blades add an awesome visual effect to the car, whether you’re going for a clean & stealthy look with the flat door blades off of a standard A4, or a super aggressive and sporty look with door blades from an Audi A4. https://www.google.com/amp/s/www.nickscarblog.com/diy/audi-a4-s4-door-blades-a-complete-guide-to-b6-b7-door-blade-options-installation/amp

-
As the title says please see attached the dpf doc for fitting a A4 cabriolet/convertible roof module. Hope it's useful 🙂 EBA_Audi_A4_FB_eng.pdf
-
I think you should be fine. But 18" will give you a better ride in my opinion.
-
You could get it retro fitted but it won't be cheap. Here's a link for an example: https://integratedautomotive.co.uk/product/audi-a4-2016-2018-b9-retrofit-carplay-and-android-auto-kit/ If it's been mis sold you're entitled to a full refund with 30 days of sale.
-
Welcome to the forum you'll find the members on here are a friendly and helpful bunch 🙂 I agree with Steve on getting a diagnostic check to see what fault codes flag up. There's no point tuning a poorly car. Dark side developments, thanos tuning and Revo are all supposed to be good. What ever tuner you use though make sure they have a rolling road for best results with any remap. You can also combine it with a stainless steel exhaust I can give positive feedback of powerflow. As well as having an upgraded panel air filter or induction kit. You could also look at an upgraded intercooler or turbo if you're considering serious power.
-
Sorry to hear of your issue. A similar issue was discussed last year on here: If it's not the sensors or the wiring to the sensors then there must be an issue with a brake module I'd suspect. The diagnostic check should flag the issue. I think you'll be left to foot the bill as the garage will claim it's not their fault. Unless you can prove damage otherwise.
-
You're most welcome 🙂 glad you got sorted. It's nice when the forum has helped members 🙂
-
If you do t use it then you could just leave it. With my A6 I've always chosen to carry out the repair. But I fully understand if you don't when you don't use the function.
-
Very good question, not sure what a full cycle would be to be honest.
-
Dark side developments aren't the cheapest but as the saying goes you get what you pay for.
-
You're welcome 🙂 In theory no, but if it were mine id try and get the up to date part and a genuine one at that. As is the age old saying "you get what you pay for".
-
Go for which ever one has the newest letter. Ie B is the updated part from.the one ending in A etc.
-
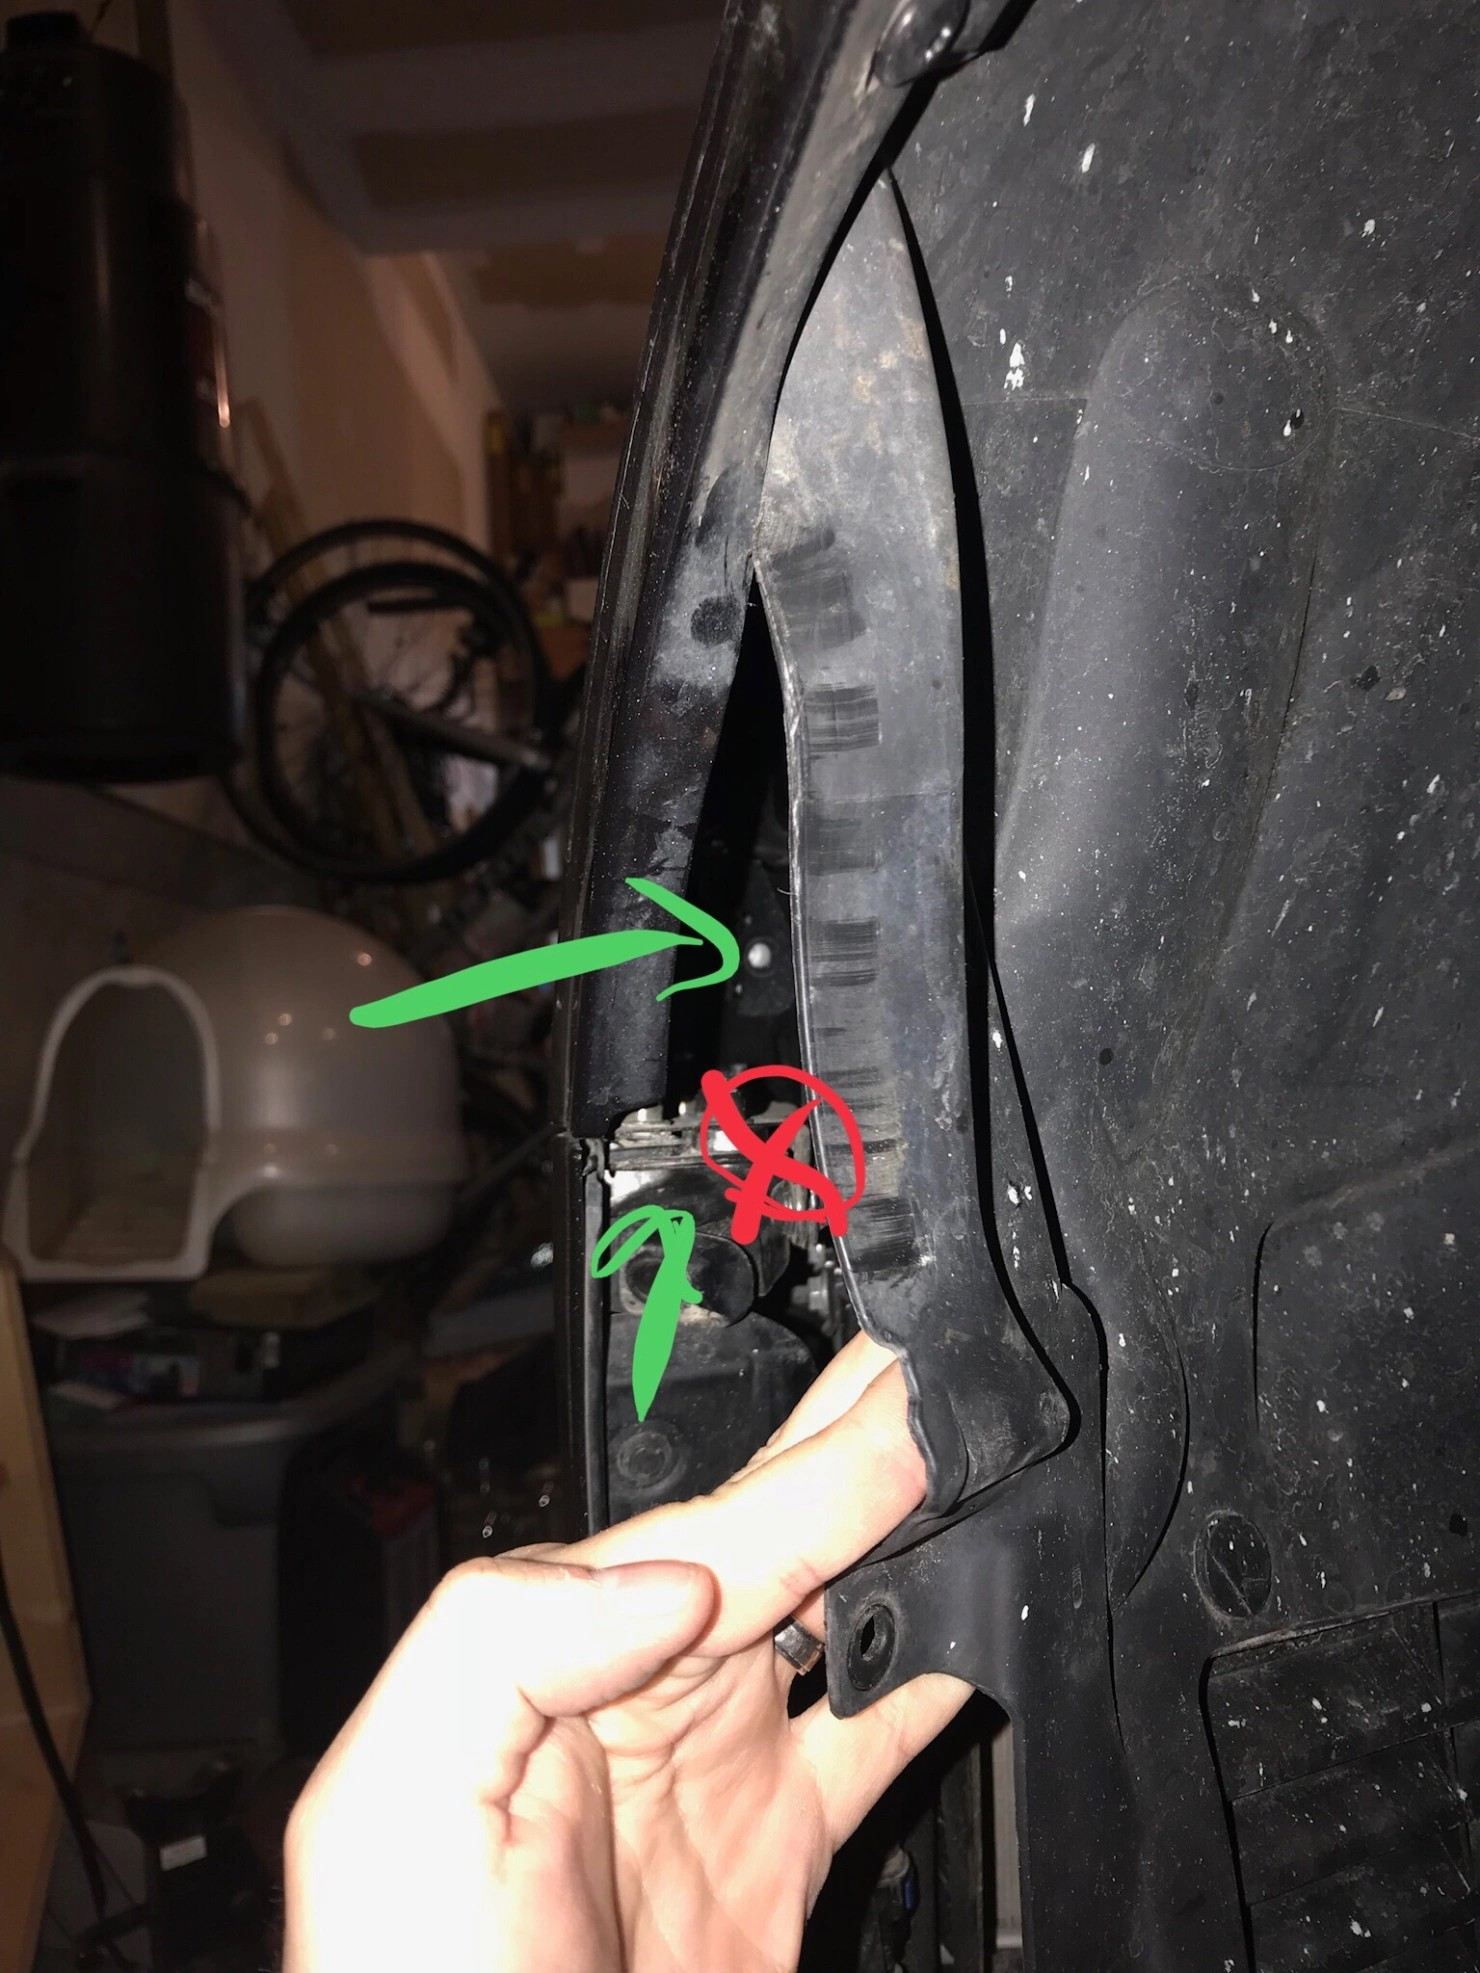
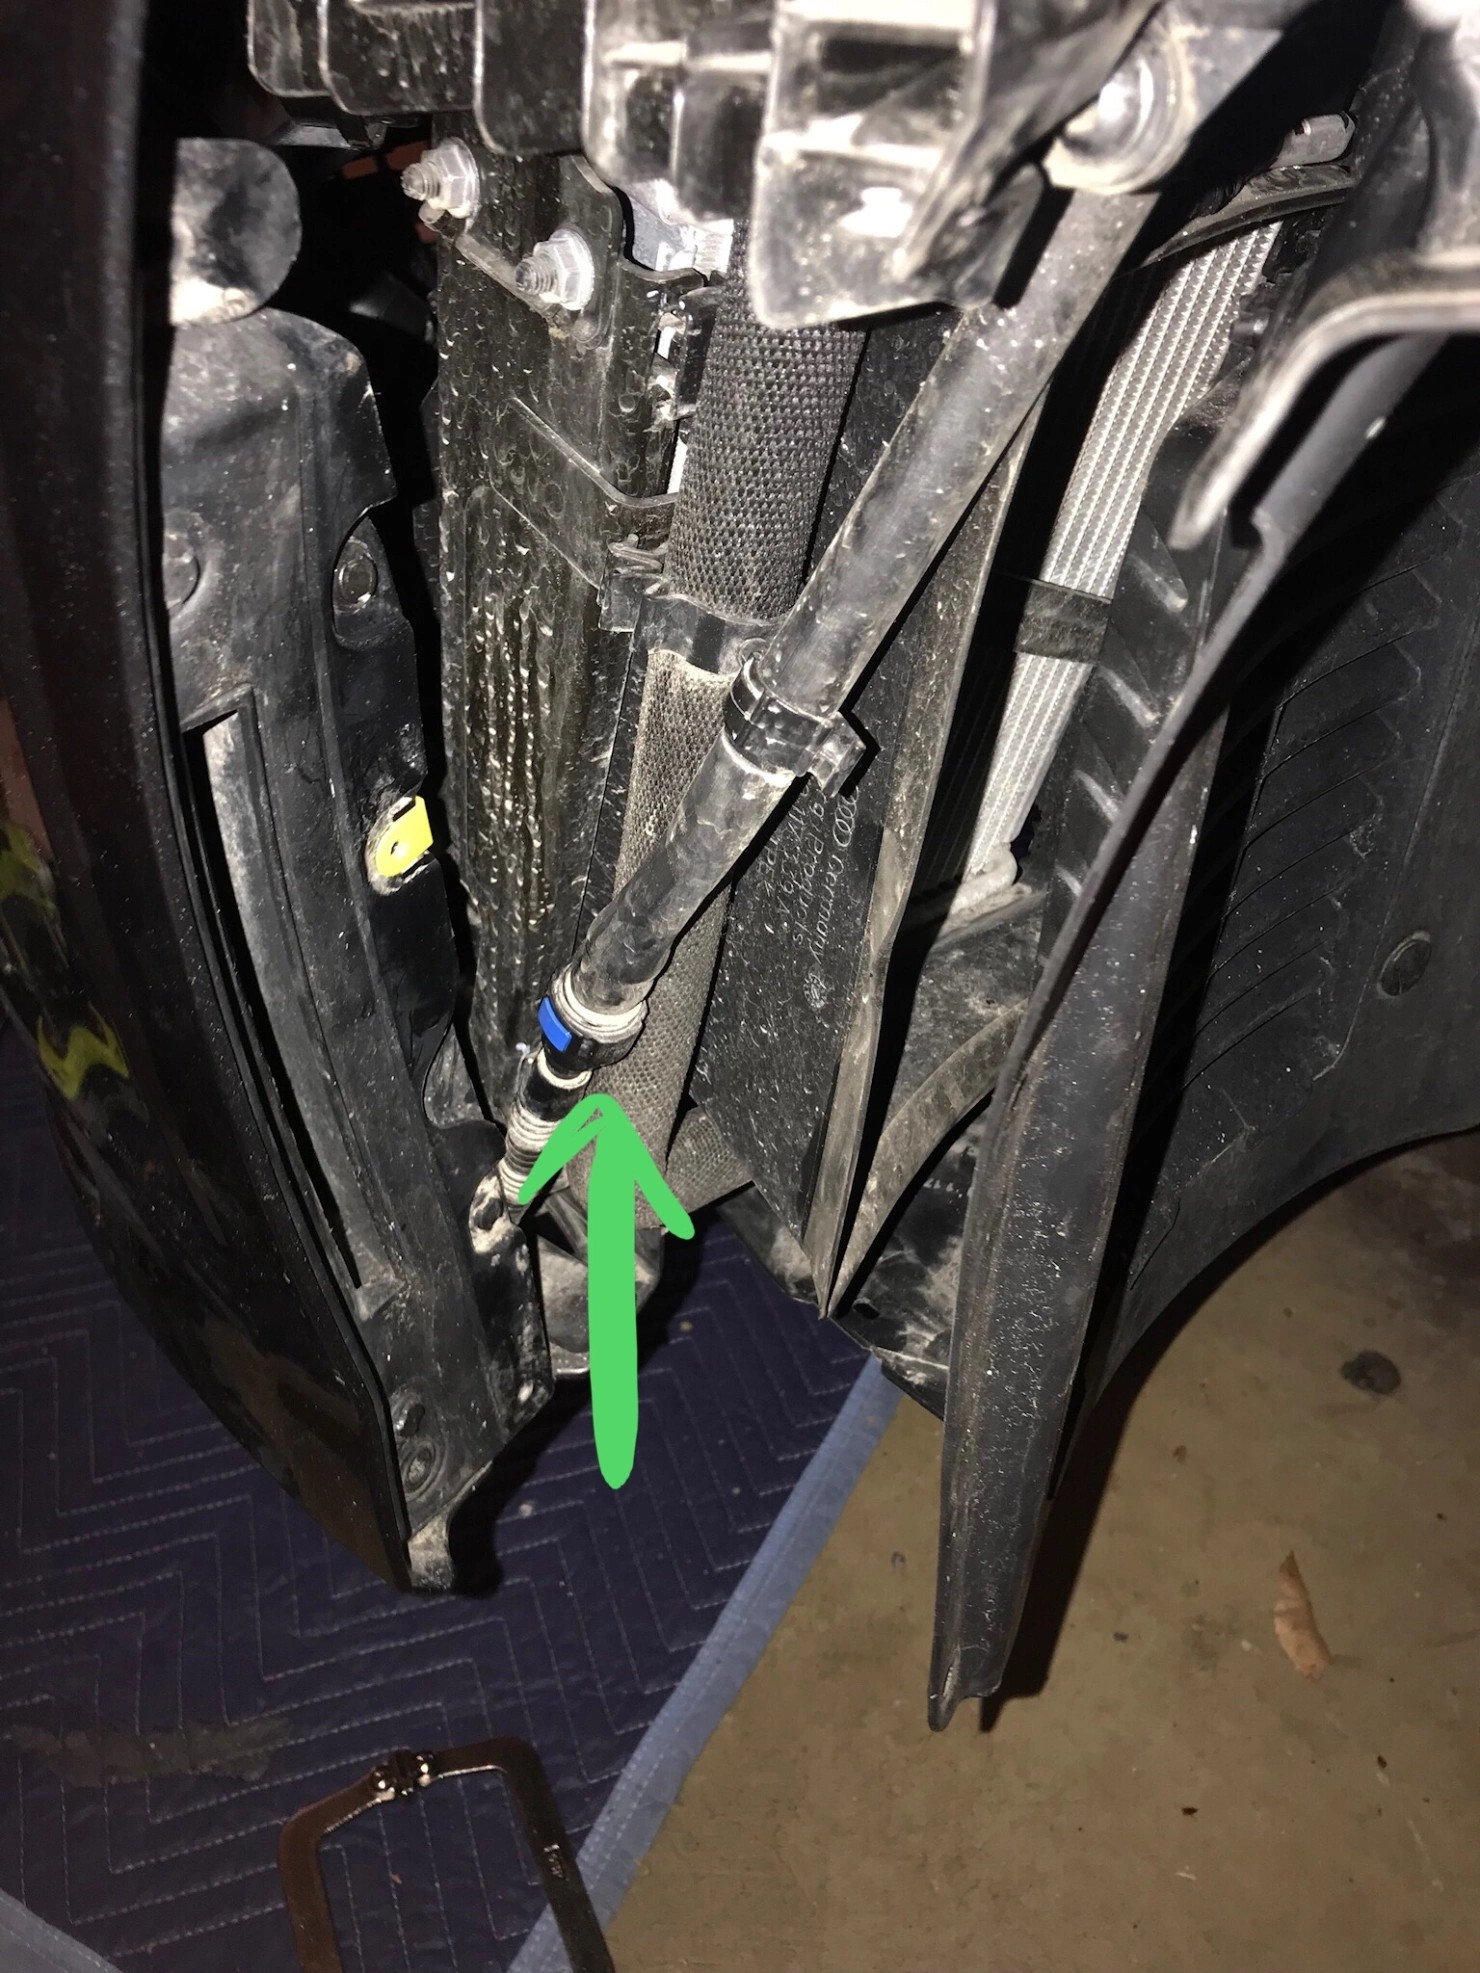
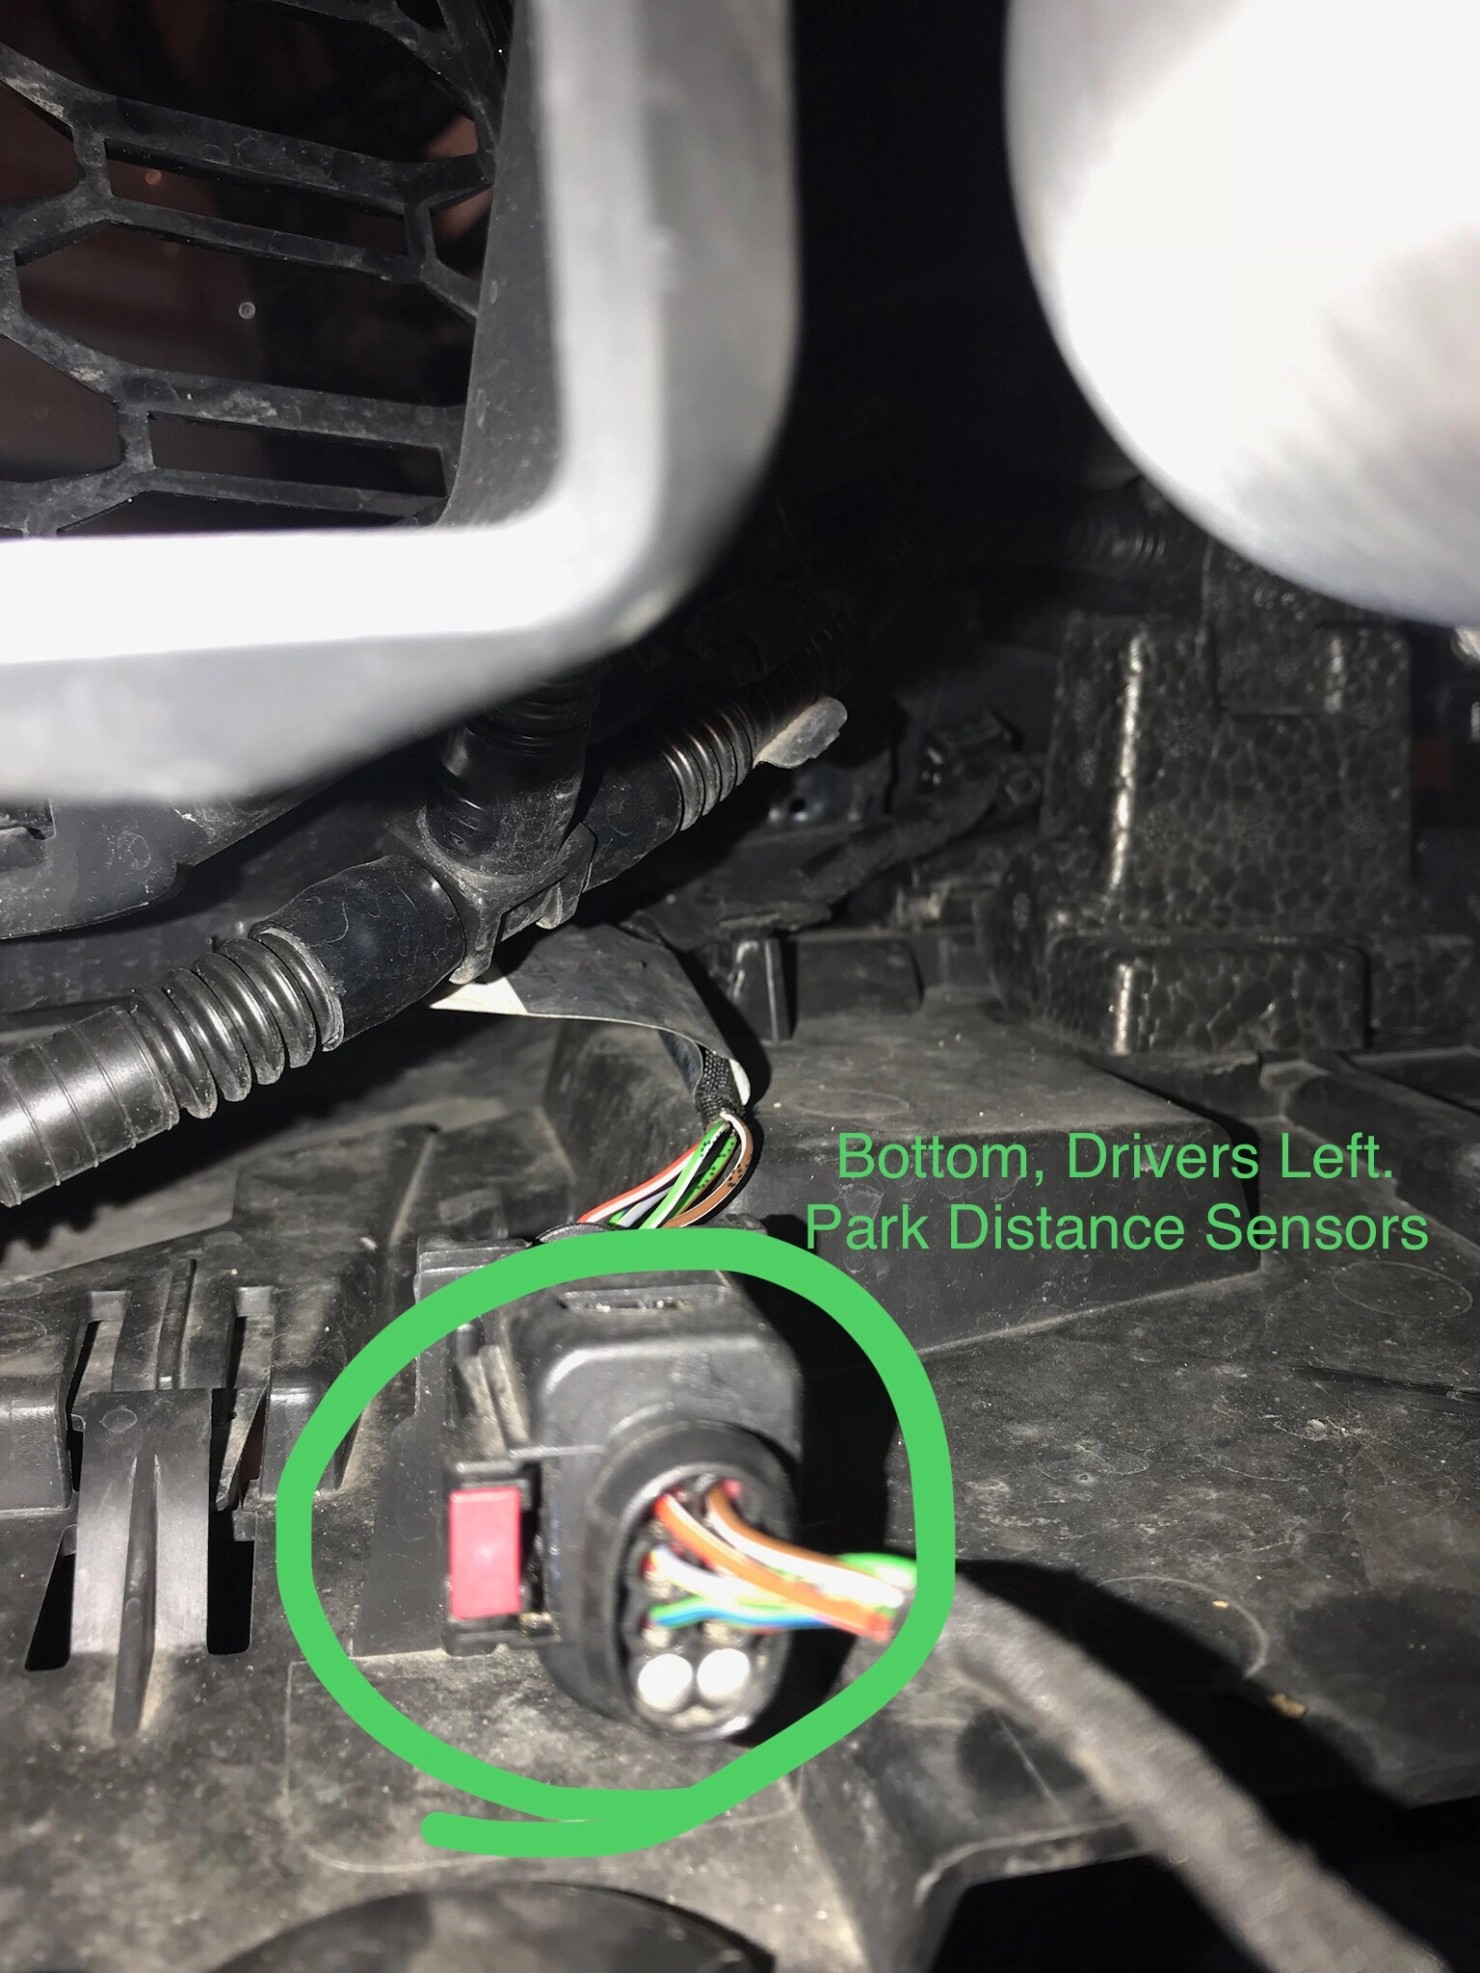
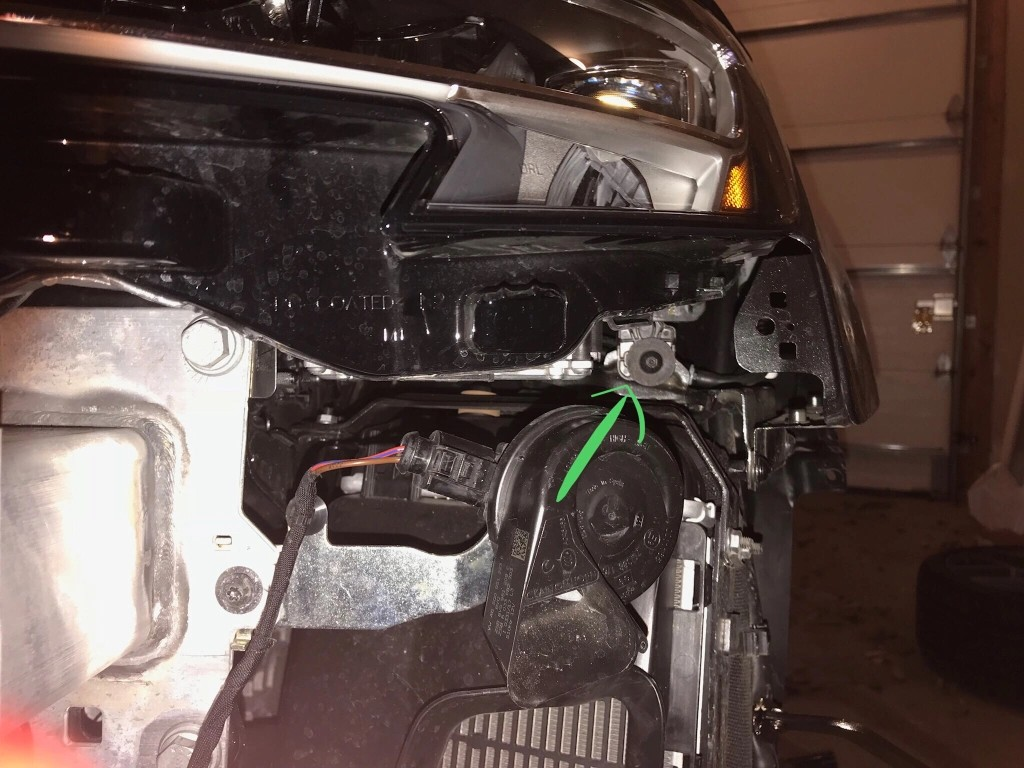
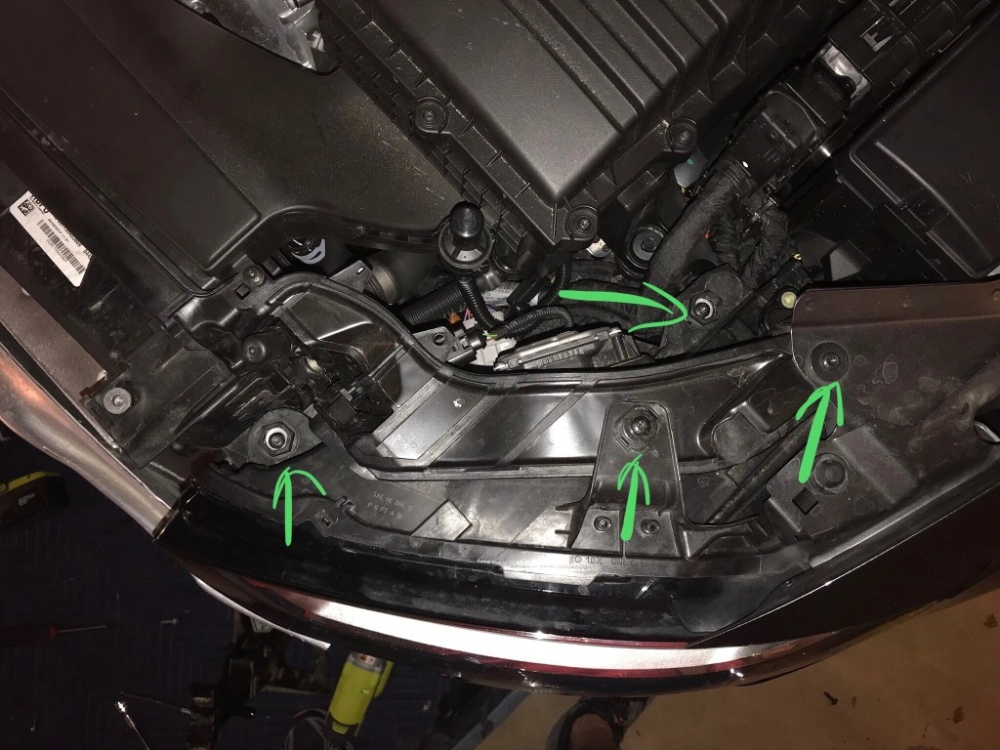
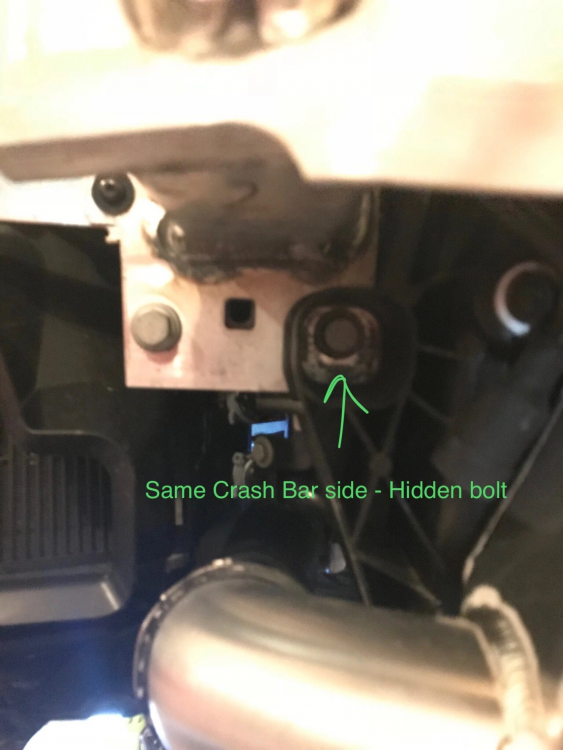
*Disclaimer: This installation guide is only that, a guide. If you run into challenges or think this may be too over your head, please contact a mechanic in your area to do it for you. By following this guide, you agree that robspace.net or any associates are affiliates are not responsible for any damage that may be caused to you, your car, your tools, or anything else you can think of. STM (Street Tuned Motorsports) has been a widely recognized and respected tuner in the Nissan world for quite some time. They’ve been the name behind some of the fastest Evo’s and GTR’s in the world, and more importantly for myself and other Audi-philes, they’ve recently decided to enter the realm of the RS3. This post serves as a walkthrough of the installation of their new intercooler for the 2017+ 8v FL RS3, based on the 1000hp rated Garret core. This Intercooler core is supporting massive builds, and should be more than enough to support the RS3, even as modifications build. For more information on the actual intercooler itself, please check out my full review. Overview of the process: Here’s what you’re getting yourself into: Removal of wheels Removal of front pieces of fender liner Removal of bumper Removal of screws for headlights Removal of crash bar and associated components Removal of factory intercooler Install STM Intercooler Re-installation of all of the rest If the above list scares you, and this guide scares you, you may want to enlist some professional assistance. I tackled this by myself, in my garage, with only the assistance of jack stands as well as a cardboard box with a towel over the top of it (to support the bumper when it came off the car). An extra set of hands would have been helpful, but is far from necessary. Tools List: Impact Wrench (for removal of bolts, only) 17mm Socket T-25, T-27, T-30 Torx drivers T-25, T-27, T-30 Torx Bits (for a socket wrench/impact wrench) 6 inch extension for above wrench Vice Grips (or other clamping pliers to hold the washer fluid line) Two jack stands Automotive jack Wheel chocks 10mm Socket 14mm Socket Flat-Head screwdriver 1: Place your car on jack stands, and remove the front wheels This is a great time to clean things out, check your brake pads, inspect your rotors, and generally make sure things look “okay” for the future. Some people have indicated that you can do this without removing the wheels – you probably can, however I believe it’s far easier with them off, and the vehicle in the air. I used a Ryobi 20v impact wrench with a Husky 17mm wheel socket, which is covered in plastic to protect your wheels during use. 2: Remove the screws of the plastic wheel-well covers You only need to remove the ones in front of the shock/spring assembly. 3: Remove screws at the bottom of the bumper Remove the three screws at the bottom of the car – you do *not* need to remove the oil pan cover. These are T-30, and match the three at the top of the bumper (but do the top ones last!). 4: Remove the screws from the sides (wings) of the bumper These were the trickiest for me; as I couldn’t find a good aspect for what to remove. You need to peel back the wheel well liner a bit, and unscrew the T-27 from the outermost post. The inside one does *not* need to be removed (circled in red with a strike-through, in the below photo). The next screw, I struggled to get a picture of. You need to pull back a little more of the wheel well liner, up above the last screw you removed. When you do this, you’ll find the T-27, and it’s hard to get to and reach, but fortunately it’s not terribly tight. I used a 1/4 inch ratchet with a 6 inch extension, plus a T-27 1/4 bit to make it all work. The photo below was taken with the screw removed so that it contrasts better with the flash so that you can see the hole. Once you’ve done this, you can pull back the wing edges from the side of the car (it’s a little bit of a tug to do it…) 5: Remove top screws Remove the three T-30 screws from the top of the bumper. 6: Pull the bumper away from the car SLOWLY!!! I had an amazon box with a microfiber towel to rest the bumper on temporarily. You’ll need to disconnect the washer fluid line: And the park-assist sensor cable (if equipped) before pulling too hard on the bumper. 7: Loosen, but do not remove the headlights Three Torx on top: One Torx at the front: No need to do much more than that for now. 8: Remove ACC radar and temperature sensor Use an Allen key to remove the sensor, including bracket from the crash bar. The temperature sensor has a pin in the center that can be pushed out, and then pushed through the back-side. Be careful with this, as I did break the bracket (sponsored by Gorilla Glue, now!). STM included a new bracket, which I took the opportunity to mount (T27 again, I believe). 9: Remove the horns and let them hang T27 – unscrew them and let them hang. 10: Remove the remainder of the bolts for the crash bar This gets tricky – As you remove these, you’ll notice that the entire radiator assembly tries to slide down – It’s important that you note roughly where this was when you started, hindsight, you might even want to take a 2×4 or something else relatively flat to place under the radiator mount (at the bottom) to ensure it doesn’t slide at all. If it does, you risk that your hood won’t line up anymore, and it will need to be adjusted a bit (more on that later). 11: Removal of the crash bar Slide the headlights out and to the sides of the car, creating a bit of wiggle room for your crash bar – you’ll lift up and rotate away from the car, and it should slide past the headlights. 12: Remove the factory intercooler Using a flathead screwdriver, loosen both hose clamps. You may need to use the flathead to get the hoses lose, but I did not. Using a <size> socket, remove the two bolts holding down the factory intercooler. This should now just lift straight off. 13: Installation of the STM intercooler Pretty straight forward, slide the hoses over the ends of the intercooler, and tighten down. 14: Rebuilding the car! Pretty much go through everything in reverse order. Here are the ‘gotchas’ I ran into during re-assembly: When you re-install the crash bar, make sure that it’s in pretty close to the same position it was when you took it off. Re-installing the hard-to-reach screw inside the wheel well – There’s no really good way that I found to do this, so I took my watch and wedding band off, and literally just shoved my hand up there until i made it fit. I did shove a head-lamp inside so that I could have a bit of light. YMMV… When you close the hood, you may find that it doesn’t line up. If needed, there are a pair of T30 screws on each hood latch bar (left and right side of the underside of the hood). Screw these in and out as needed to ensure alignment. Once you get these aligned, you can lower/raise the rubber bump-stops up or down to ensure that the hood doesn’t rattle while closed and fits nice and snug. I personally aimed for the point where I didn’t need to slam it, but could close it gently and then simply “push” down to get each side to latch. https://robspace.net/2018/06/24/2018-8v-audi-rs3-intercooler-install-guide/


-
As the title says please see attached the dpf doc for fitting a load guard to a b9 Avant. I hope it's useful 🙂 8W9017221_ENG.PDF